
This post is the first of the Jinja tutorial series where I'll provide an overview of the language, discussion of its features and a healthy dose of example use cases. If you're new to the world of templating, know what templates are but never used Jinja before, or simply need to refresh your memory, then you should found this series useful.
Jinja2 Tutorial series
- Jinja2 Tutorial - Part 1 - Introduction and variable substitution
- Jinja2 Tutorial - Part 2 - Loops and conditionals
- Jinja2 Tutorial - Part 3 - Whitespace control
- Jinja2 Tutorial - Part 4 - Template filters
- Jinja2 Tutorial - Part 5 - Macros
- Jinja2 Tutorial - Part 6 - Include and Import
- J2Live - Online Jinja2 Parser
Contents
- Introduction
- Jinja templating basics
- Conclusion
- References
- GitHub repository with resources for this post
Introduction
What is Jinja2?
Jinja2 is a feature rich templating language widely used in the Python ecosystem. It can be used directly in your Python programs and a lot of larger applications use it as their template rendering engine.
Templating languages allow creation of text based documents where some of the content can be dynamically generated. Resulting files can be HTML, JSON, XML, or anything that uses pure text as the encoding. The idea is to capture business logic in the code while giving template designer tools to control flow and layout of the end document.
Where is it used?
Some notable examples of applications using Jinja2 are Ansible, Django, Flask, Salt and Trac. Many other Python web frameworks also use it as well as countless other Python projects.
What is so good about it?
Jinja2 comes with a lot of great features:
- Control structures (loops and conditional statements)
- Rich set of built-in filters and tests
- Template inheritance
- Macros
- Support for custom filters
- HTML escaping
- Sandbox environment for safely rendering untrusted templates
- Easy to debug
- Configurable syntax
Discussions and example use of the above features will form large part of this series.
Why would I want to use it?
Web frameworks like Flask and Django, or automation ones like Ansible and Salt, provide out of the box support for Jinja. It's a natural choice for templating engine when using any of those. Ansible even uses a lot of the Jinja syntax in its Playbooks.
For your own programs, you should consider using Jinja2 if you have blocks of text that are dynamically generated from data structures. Not only will it logically separate your templates from your code, it will also allow others to make changes to the templates independently without having to modify source code of the application.
I think that having good knowledge of Jinja2 will allow you to become more productive. It's also ubiquitous in the world of network automation. With Jinja's widespread use you will find that it's worth investing your time into learning it.
How does it work?
Jinja2 essentially needs two source ingredients, template and data that will be used to render the final document.
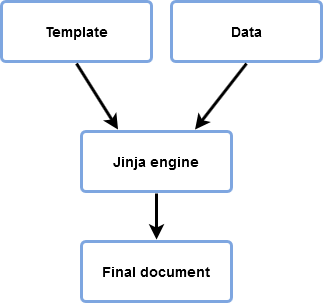
Jinja2 doesn't care where the data comes from, this could come from JSON returned by some API, be loaded from static YAML file, or simply be a Python Dict defined in our app.
All that matters is that we have Jinja template and some data to render it with.
Jinja templating basics
We now know what Jinja is and why would one use it. Time to start looking at simple examples to familiarize ourselves with the general look and structure of templates.
Basic idea behind templating is taking some text documents and figuring out which bits are unchanged among all instances and which can be parametrized. That is, we want some of the elements of the text to change depending on the data we have available at hand.
Since I mostly work with network device configs, this is what I'll be using in my examples.
Variable substitution
Below is a short Cisco IOS configuration snippet which we'll use in our first example.
hostname par-rtr-core-01

no ip domain lookup
ip domain name local.lab
ip name-server 1.1.1.1
ip name-server 8.8.8.8

ntp server 0.pool.ntp.org prefer
ntp server 1.pool.ntp.org
First step that we need to take is to identify elements that are static and the ones that might change between devices.
In our case words like "hostname", "ip name-server" etc. are configuration statements used by particular network OS. These remain unchanged, as long as the same NOS is running on the device.
The actual hostname, and possibly names of the name servers and ntp servers, should be turned into variables that will be substituted for actual values when template is rendered.
Now, I said 'possibly' with regards to some of the elements because these decisions are specific to your environment. Generally, it's easier to parametrize these elements early on even if currently the same values are used everywhere. Over time our network might grow and some of the values might depend on the region or data center location which lends itself naturally to using variable reference. Or perhaps you want to change one of the name-servers, by parameterizing these values you only have to change them in one place followed by re-generation of the configs for all of the devices.
For the sake of our example I decided to turn hostname, name-servers and ntp servers into variables. Our end template can be found below:
hostname {{ hostname }}

no ip domain lookup
ip domain name local.lab
ip name-server {{ name_server_pri }}
ip name-server {{ name_server_sec }}

ntp server {{ ntp_server_pri }} prefer
ntp server {{ ntp_server_sec }}
In Jinja anything found between double opening and double closing curly braces tells the engine to evaluate and then print it. Here the only thing found between curly braces is a name, specifically a variable name. Jinja expects this variable to be provided to the engine by you and it simply takes the value referred by the variable replacing {{ name }} statement with that value.
In other words, Jinja just substitutes the variable name for its value. That is the most basic component you'll be using in your templates.
Ok, so one thing gets replaced by the other. But how do we define the "thing" and how do we give it to Jinja engine?
This is where we need to choose a data format and tool that feeds the data to our template.
There is quite a few options, with the below ones being the most commonly used.
For data format:
- YAML file
- JSON file
- Native Python dictionary
For glue, some of the options:
- Python script
- Ansible playbook
- Built-in support in the Web framework (Flask, Django)
Examples
For most of my examples I'll be using various Python scripts and Ansible playbooks, with data coming from native Python dict as well as YAML and JSON files.
Here I'll use minimal Python script followed by Ansible playbook. Ansible example shows how easy it's to generate templates with little, or no, programming skills. You'll also be seeing Ansible a lot in the world of infrastructure automation so it's good to know how to use it for generating files with templates.
Python example
First off, Python script:
from jinja2 import Template

template = """hostname {{ hostname }}

no ip domain lookup
ip domain name local.lab
ip name-server {{ name_server_pri }}
ip name-server {{ name_server_sec }}

ntp server {{ ntp_server_pri }} prefer
ntp server {{ ntp_server_sec }}"""

data = {
    "hostname": "core-sw-waw-01",
    "name_server_pri": "1.1.1.1",
    "name_server_sec": "8.8.8.8",
    "ntp_server_pri": "0.pool.ntp.org",
    "ntp_server_sec": "1.pool.ntp.org",
}

j2_template = Template(template)

print(j2_template.render(data))
And the output:
hostname core-sw-waw-01

no ip domain lookup
ip domain name local.lab
ip name-server 1.1.1.1
ip name-server 8.8.8.8

ntp server 0.pool.ntp.org prefer
ntp server 1.pool.ntp.org
It worked wonderfully. Template was rendered with the data we provided to it.
As you can see this really is quite simple, template is just some text with placeholders, data is a standard Python dictionary with each key name corresponding to the variable name in the template. We just need to create jinja2 Template object and pass our data to its render method.
I should mention that the way we render Jinja in the above script should only be used for debugging and proof of concept code. In the real world data should come from external files or databases and templates should be loaded after we set up Jinja environment. I didn't want to muddy the waters early on as we'll dig deeper into these concepts a bit later.
Ansible example
Just to show alternatives, we will also render the same template using Ansible. Here template is stored in a separate file and data comes from the host var file matching the name of the device, which is how we'd generally record per-host data.
Below is the directory structure:
przemek@quasar:~/nauto/jinja/ansible$ ls -R
.:
hosts.yml  host_vars  out  templates  templ-simple-render.yml  vars

./host_vars:
core-sw-waw-01.yml

./out:

./templates:
core-sw-waw-01.j2

./vars:
YAML file with data:
(venv) przemek@quasar:~/nauto/jinja/ansible$ cat host_vars/core-sw-waw-01.yml
---
hostname: core-sw-waw-01
name_server_pri: 1.1.1.1
name_server_sec: 8.8.8.8
ntp_server_pri: 0.pool.ntp.org
ntp_server_sec: 1.pool.ntp.org
Template is identical to the one used in Python example but it's stored in an external file:
(venv) przemek@quasar:~/nauto/jinja/ansible$ cat templates/base-cfg.j2
hostname {{ hostname }}

no ip domain lookup
ip domain name local.lab
ip name-server {{ name_server_pri }}
ip name-server {{ name_server_sec }}

ntp server {{ ntp_server_pri }} prefer
ntp server {{ ntp_server_sec }}
And finally, playbook that does the rendering:
(venv) przemek@quasar:~/nauto/jinja/ansible$ cat j2-simple-render.yml
---
- hosts: core-sw-waw-01
  gather_facts: no
  connection: local

  tasks:
    - name: Render config for host
      template:
        src: "templates/base-cfg.j2"
        dest: "out/{{ inventory_hostname }}.cfg"
All that's left is to execute our Playbook:
(venv) przemek@quasar:~/nauto/jinja/ansible$ ansible-playbook -i hosts.yml j2-simple-render.yml

PLAY [core-sw-waw-01] *************************************************************************************************************

TASK [Render config for host] *****************************************************************************************************
changed: [core-sw-waw-01]

PLAY RECAP ************************************************************************************************************************
core-sw-waw-01             : ok=1    changed=1    unreachable=0    failed=0    skipped=0    rescued=0    ignored=0
The result matches the output of Python script, except here we save the output to the file:
(venv) przemek@quasar:~/nauto/jinja/ansible$ cat out/core-sw-waw-01.cfg
hostname core-sw-waw-01

no ip domain lookup
ip domain name local.lab
ip name-server 1.1.1.1
ip name-server 8.8.8.8

ntp server 0.pool.ntp.org prefer
ntp server 1.pool.ntp.org
These examples are perhaps not overly exciting but with variable substitution alone we can create some useful templates. You can also see how little effort was required to get started with rendering templates in Ansible.
Dictionaries as variables
Let's continue with variable substitution but we'll use more complex data structure. This time we'll use variables that are dictionaries.
Using dictionaries (also called hash tables or objects) allows for logical grouping of related pieces of data. For instance, attributes related to an interface can be stored in a dictionary, here shown in JSON format:
{
  "interface": {
    "name": "GigabitEthernet1/1",
    "ip_address": "10.0.0.1/31",
    "description": "Uplink to core",
    "speed": "1000",
    "duplex": "full",
    "mtu": "9124"
  }
}
Accessing items in dictionary is very convenient, you just need to know the key to get corresponding value, and hence are ubiquitous in the world of JSON and YAML.
Jinja gives a handy way of accessing dictionary keys using using "dot" notation. However this only works for keys that don't have special characters in the name.
Using above interface dictionary we could create interface config snippet using below template:
interface {{ interface.name }}
 description {{ interface.description }}
 ip address {{ interface.ip_address }}
 speed {{ interface.speed }}
 duplex {{ interface.duplex }}
 mtu {{ interface.mtu }}
And this is what we get once it's rendered:
interface GigabitEthernet1/1
 description Uplink to core
 ip address 10.0.0.1/31
 speed 1000
 duplex full
 mtu 9124
So that was pretty straightforward but already opens up more possibilities over using simple variables, especially for objects having multiple attributes.
Now, remember that I mentioned that "dot" notation can't be used with keys having special characters in their names. If you have . - dot, - - dash, or anything else that is not allowed as a character in the Python variable name then you can't use dot notation. In these cases you need to use standard Python subscript notation []. I find this mostly is a problem with keys that are IP addresses.
For instance to access the 10.0.0.0/24 key in the below dictionary we have to use Python subscripts:
prefixes:
  10.0.0.0/24:
    description: Corporate NAS
    region: Europe
    site: Telehouse-West
Template using the 10.0.0.0/24 key:
Details for 10.0.0.0/24 prefix:
 Description: {{ prefixes['10.0.0.0/24'].description }}
 Region: {{ prefixes['10.0.0.0/24'].region }}
 Site: {{ prefixes['10.0.0.0/24'].site }}
Undefined variables
I feel like this is a good place to talk about what happens when Jinja encounters an undefined variable. This is actually relatively common when dealing with larger templates that use a lot of variables.
By default, when encountering an evaluation statement with undefined variable Jinja will replace it with an empty string. This often comes as a surprise to people writing their first templates.
This behavior can be changed by setting argument undefined, taken by Template and Environment objects, to a different Jinja undefined type. Default type is Undefined, but there are other types available, StrictUndefined being the most useful one. By using StrictUndefined type we tell Jinja to raise error whenever there's an attempt at using undefined variable.
Compare the results of rendering the below template with provided data, first one using default Undefined type and second one using StrictUndefined:
from jinja2 import Template

template = "Device {{ name }} is a {{ type }} located in the {{ site }} datacenter."

data = {
    "name": "waw-rtr-core-01",
    "site": "warsaw-01",
}

j2_template = Template(template)

print(j2_template.render(data))
Device waw-rtr-core-01 is a located in the warsaw-01 datacenter.
Our template made reference to variable named type but data we provided does not have that var so the final evaluation results in an empty string.
Second run will use StrictUndefined type:
from jinja2 import Template, StrictUndefined

template = "Device {{ name }} is a {{ type }} located in the {{ site }} datacenter."

data = {
    "name": "waw-rtr-core-01",
    "site": "warsaw-01",
}

j2_template = Template(template, undefined=StrictUndefined)
(venv) przemek@quasar:~/nauto/jinja/python$ python j2_undef_var_strict.py
Traceback (most recent call last):
  File "j2_undef_var_strict.py", line 12, in <module>
    print(j2_template.render(data))
  File "/home/przemek/nauto/jinja/python/venv/lib/python3.6/site-packages/jinja2/environment.py", line 1090, in render
    self.environment.handle_exception()
  File "/home/przemek/nauto/jinja/python/venv/lib/python3.6/site-packages/jinja2/environment.py", line 832, in handle_exception
    reraise(*rewrite_traceback_stack(source=source))
  File "/home/przemek/nauto/jinja/python/venv/lib/python3.6/site-packages/jinja2/_compat.py", line 28, in reraise
    raise value.with_traceback(tb)
  File "<template>", line 1, in top-level template code
jinja2.exceptions.UndefinedError: 'type' is undefined
With strict error checking we get error straight away.
It's worth noting that Ansible uses StrictUndefined by default so when you us it to render Jinja template you'll get errors whenever there's a reference to an undefined variable.
Overall I suggest always enabling undefined type to StrictUndefined. If you don't do it you can get some very subtle bugs in your templates that will be difficult to find. At first it might be easy to understand why a value is missing in the output but over time, with templates growing larger, it's difficult for human eye to notice something is not right. You definitely don't want to be only realizing your templates are broken when loading config onto your devices!
Adding comments
Before we wrap this post up I just wanted to show you how to include comments in your templates. Generally templates should be self explanatory but comments come in handy when multiple people work on the same template and your future self will probably be grateful for explaining non-obvious bits as well. You can also use comment syntax to disable parts of the template during debugging.
Comments are added using {# ... #} syntax. That is anything between {# and #} is treated as a comment and will be ignored by the engine.
Below is our first example with some comments added to it:
from jinja2 import Template

template = """hostname {{ hostname }}

{# DNS configuration -#}
no ip domain lookup
ip domain name local.lab
ip name-server {{ name_server_pri }}
ip name-server {{ name_server_sec }}

{# Time servers config, we should use pool.ntp.org -#}
ntp server {{ ntp_server_pri }} prefer
ntp server {{ ntp_server_sec }}
ntp server {{ ntp_server_trd }}"""

data = {
    "hostname": "core-sw-waw-01",
    "name_server_pri": "1.1.1.1",
    "name_server_sec": "8.8.8.8",
    "ntp_server_pri": "0.pool.ntp.org",
    "ntp_server_sec": "1.pool.ntp.org",
}

j2_template = Template(template)

print(j2_template.render(data))
And the output:
hostname core-sw-waw-01

no ip domain lookup
ip domain name local.lab
ip name-server 1.1.1.1
ip name-server 8.8.8.8

ntp server 0.pool.ntp.org prefer
ntp server 1.pool.ntp.org
ntp server
No sign of comments. Though you might have noticed - (dash) character just before closing #}. Without that dash an extra empty line would have been added after each comment.
Whitespace treatment in Jinja is not very intuitive and it's possibly one of the most confusing parts of the language. In one of the future posts I will discuss in detail different scenarios and techniques that will allow you to make your templates look exactly the way you want it.
Conclusion
This concludes first post in the Jinja Tutorial series. What I showed you here should be enough to get you to start creating your own templates. In the future posts we'll have a look at other features and we'll work through examples illustrating use cases.
Stay tuned!
References
- Official documentation for the latest version of Jinja2 (2.11.x). Available at: https://jinja.palletsprojects.com/en/2.11.x/
- Jinja2 Python library at PyPi. Available at: https://pypi.org/project/Jinja2/
- GitHub repo with source code for Jinja. Available at: https://github.com/pallets/jinja/
- GitHub repo with resources for this post. Available at: https://github.com/progala/ttl255.com/tree/master/jinja2/jinja-tutorial-p1-intro-substitution