
It’s time to have a look at some Network Automation tools. Today I want to introduce you to Vrnetlab, great piece of software that allows you to run virtual routers inside Docker containers. We’ll talk about what Vrnetlab does and what are its selling points. Then we’ll see how to bring up lab devices by hand and how to use them.
Contents
- Vrnetlab overview
- Installing Vrnetlab and its dependencies
- Building images with virtual devices
- Launching virtual devices
- Helper bash functions
- Accessing devices
- Connecting devices together
- Bring up pre-defined topology with Docker Compose
- Conclusion
- References
- GitHub repository with resources for this post
Vrnetlab overview
Vrnetlab provides convenient way of building virtualized network environments by leveraging existing Docker ecosystem.
This means that you can take image of virtual appliance provided by the vendor and use Vrnetlab to create containers for it. The selling point here is that the whole tool-chain was created with automation in mind, that is you can build your network automation CI pipeline on top of Vrnetlab and no human is needed to spin up the environment, and run desired tests or validations.
At the same time, you can still access the virtual devices via telnet or ssh, which is handy for quick labbing. I do that often when I want to make sure I got the CLI syntax right.
It's worth mentioning that Vrnetlab is heavily used at Deutsche Telekom where it was developed by Kristian Larsson @plajjan. So it's not just a tiny pet project, it's very much a grown up tool.
Why Vrnetlab?
Why use Vrnetlab and not GNS3, EVE-NG or some other emulation software? The way I see it, other tools put emphasis on GUI and interactive labbing whereas Vrnetlab is very lightweight with focus on use in automated pipelines. With exception of Docker, which most of the CI/CD systems already use heavily, there’s no actual software to install, it’s mostly container building scripts and helper tools.
Vrnetlab internals
A lot of heavy-lifting in Vrnetlab is done by tools it provides for building Docker container images with virtual appliances, that you get from networking vendors. Inside of final Docker container we have qemu/KVM duo responsible for running virtualized appliances.
Now, if you wanted to run these appliances individually you’d have to understand what’s required for turning them up, what resources they need and how can their virtual interfaces be exposed to the external world, to mention just a few things. And if you ever tried to do it yourself you know that all of this can vary wildly not only from vendor to vendor, but even between virtual images from the same vendor.
With Vrnetlab, you get build and bootstrap scripts for each of the supported appliances. These scripts are responsible for setting things like default credentials, management IPs, uploading licenses or even packaging multiple images in some cases. You don't have to worry about any of that anymore, Vrnetlab takes care of it all.
You can think of it as having an abstraction layer on top of various virtual appliances. Once you built your containers you will be able to access and manage them in standardized fashion regardless of the image they contain.
In other words, Vrnetlab is a perfect match for the world of Network Automation!
Vrnetlab currently supports virtual devices from the following vendors:
- Arista
- Cisco
- Juniper
- Nokia
- Mikrotik
- OpenWrt (Open Source OS)
You can check GitHub repository to see up to date list of available docker image builders.
Few words on Docker
If you haven't used Docker much, don't worry, Docker is used here mostly as packaging system. This allows us to leverage an existing tooling ecosystem. Many CI systems have support for bringing up, running tests within, and tearing down applications packaged as Docker images. You can also use container orchestration systems, like Kubernetes, to launch and control your virtual appliances.
You don’t actually need to know much about Docker apart from few commands which I’ll show you. Also, building steps and examples are well documented in the Vrnetlab repository.
Installing Vrnetlab and its dependencies
Vrnetlab has a few prerequisites and there are some things to look out for so I’m including full installation procedure below.
For reference, this is the setup I used for this blog post:
- VMware Workstation Pro running under Windows
- My virtual machine has virtualization extension enabled
- Guest operating system is fresh install of Ubuntu 20.04.1 LTS
Note: If you’re running Vrnetlab in virtual environment you need to make sure that your environment supports nested virtualization. This is needed by KVM and Vrnetlab won’t work correctly without this.
Installing KVM
- First make sure that virtualization is enabled, 0 means no hw virtualization support, 1 or more is good.
przemek@quark ~$ egrep --count "vmx|smv" /proc/cpuinfo
8
- Install KVM requisite packages.
przemek@quark ~$ sudo apt-get install qemu-kvm libvirt-daemon-system libvirt-clients bridge-utils
- Add your user to groups ‘kvm’ and ‘libvirt’. Logout and login after for changes to take effect.
przemek@quark:~$ sudo adduser `id -un` kvm
Adding user `przemek' to group `kvm' ...
Adding user przemek to group kvm
Done.
przemek@quark:~$ sudo adduser `id -un` libvirt
Adding user `przemek' to group `libvirt' ...
Adding user przemek to group libvirt
Done.
- Confirm KVM is installed and operational. Empty output is fine; if something went wrong you’ll get errors.
przemek@quark:~$ virsh list --all
 Id   Name   State
--------------------
And that’s it for KVM.
Installing Docker engine
- First we need to update package index and get apt ready to install HTTP repos.
przemek@quark:~$ sudo apt-get update

przemek@quark:~$ sudo apt-get install \
    apt-transport-https \
    ca-certificates \
    curl \
    gnupg-agent \
    Software-properties-common
- Next add GPG key for Docker to apt and verify the key matches fingerprint
9DC8 5822 9FC7 DD38 854A E2D8 8D81 803C 0EBF CD88
przemek@quark:~$ curl -fsSL https://download.docker.com/linux/ubuntu/gpg | sudo apt-key add -

przemek@quark:~$ sudo apt-key fingerprint 0EBFCD88

pub   rsa4096 2017-02-22 [SCEA]
      9DC8 5822 9FC7 DD38 854A  E2D8 8D81 803C 0EBF CD88
uid           [ unknown] Docker Release (CE deb) <docker@docker.com>
sub   rsa4096 2017-02-22 [S]
- Add stable Docker repository to apt.
przemek@quark:~$ sudo add-apt-repository \
   "deb [arch=amd64] https://download.docker.com/linux/ubuntu \
   $(lsb_release -cs) \
   stable"
- Finally update the package index and install Docker Engine and containerd.
przemek@quark:~$ sudo apt-get update
przemek@quark:~$ sudo apt-get install docker-ce docker-ce-cli containerd.io
- Run basic container to confirm installation was successful.
sudo docker run hello-world
- Optionally, add your username to the
dockergroup if you want to use Docker as a non-root user. I tend to do in lab environment but this might not be appropriate for your production environment, so check with your security team before doing this in prod.
przemek@quark:~$ sudo usermod -aG docker `id -un`
Docker is now installed.
Clone Vrnetlab repository
The quickest way to get Vrnetlab is to clone it from its repository:
przemek@quark:~/netdev$ git clone https://github.com/plajjan/vrnetlab.git
Cloning into 'vrnetlab'...
remote: Enumerating objects: 13, done.
remote: Counting objects: 100% (13/13), done.
remote: Compressing objects: 100% (13/13), done.
remote: Total 2558 (delta 3), reused 5 (delta 0), pack-reused 2545
Receiving objects: 100% (2558/2558), 507.67 KiB | 227.00 KiB/s, done.
Resolving deltas: 100% (1567/1567), done.
przemek@quark:~/netdev$ ls
Vrnetlab
And that’s it! Vrnetlab and all of its dependencies are installed and we’re ready to roll!
Building images with virtual devices
I mentioned previously that Vrnetlab provides build scripts for plenty of virtual routers from different vendors. What we don’t however get is the actual images.
Licenses that come with appliances don’t allow repackaging and distribution from sources other than the official channels. We will have to procure images ourselves.
If you don’t have any images handy and you just want to follow this post, you can register for free account with Arista and download image from the below link:
https://www.arista.com/en/support/software-download
You will need two images:
- AbootAboot-veos-serial-8.0.0.iso
- vEOS-lab-4.18.10M.vmdk
They are highlighted in green on the below screenshot:
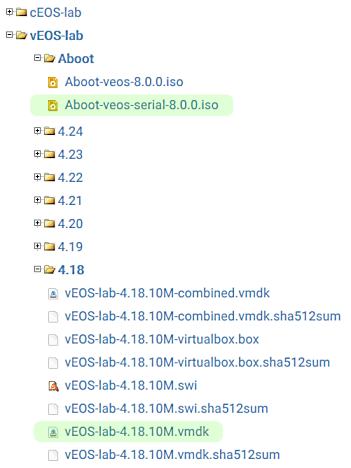
Once you downloaded the images, you need to copy them to veos directory inside of vrnetlab directory. The end result should match the below output:
przemek@quark:~/netdev/vrnetlab/veos$ ls
Aboot-veos-serial-8.0.0.iso  Makefile   vEOS-lab-4.18.10M.vmdk
docker                       README.md
With files in place we’re ready to kick off Docker image build by running make command inside of the directory:
przemek@quark:~/netdev/vrnetlab/veos$ make
Makefile:18: warning: overriding recipe for target 'docker-pre-build'
../makefile.include:18: warning: ignoring old recipe for target 'docker-pre-build'
for IMAGE in vEOS-lab-4.18.10M.vmdk; do \
	echo "Making $IMAGE"; \
	make IMAGE=$IMAGE docker-build; \
done
Making vEOS-lab-4.18.10M.vmdk

...( cut for brevity )

 ---> Running in f755177783db
Removing intermediate container f755177783db
 ---> 71673f34bae9
Successfully built 71673f34bae9
Successfully tagged vrnetlab/vr-veos:4.18.10M
make[1]: Leaving directory '/home/przemek/netdev/vrnetlab/veos'
If everything worked correctly you should now have a new Docker image available locally. You can confirm that by running docker images command.
przemek@quark:~/netdev/vrnetlab/veos$ docker images vrnetlab/vr-veos
REPOSITORY          TAG                 IMAGE ID            CREATED             SIZE
vrnetlab/vr-veos    4.18.10M            71673f34bae9        32 minutes ago      894MB
You can optionally rename the image, to make the name shorter, or if you want to push it to your local docker registry.
przemek@quark:~$ docker tag vrnetlab/vr-veos:4.18.10M veos:4.18.10M
Now our image has 2 different names:
przemek@quark:~/netdev/repos/nginx-proxy$ docker images | grep 4.18.10
vrnetlab/vr-veos      4.18.10M            71673f34bae9        34 minutes ago      894MB
veos                  4.18.10M            71673f34bae9        34 minutes ago      894MB
You can safely delete the default name if you wish so:
przemek@quark:~/netdev$ docker rmi vrnetlab/vr-veos:4.18.10M
Untagged: vrnetlab/vr-veos:4.18.10M
przemek@quark:~/netdev$ docker images | grep 4.18.10
veos                  4.18.10M            71673f34bae9        53 minutes ago      894MB
Launching virtual devices
With that, all pieces are in place for us to run our first virtual router in Docker!
Run the below command to start container:
docker run -d --name veos1 --privileged veos:4.18.10M
This tells docker to start new container in the background using image we built. Argument --privileged is required by KVM, argument --name gives our chosen name to container, and the last argument veos:4.18.10M is the name of the image.
Here’s the command in action:
przemek@quark:~/netdev/vrnetlab$ docker run -d --name veos1 --privileged veos:4.18.10M
c62299c4785f5f6489e346ea18e88f584b18f6f91e50b7c0490ef4752e926dc8

rzemek@quark:~/netdev/vrnetlab$ docker ps | grep veos1
c62299c4785f        veos:4.18.10M             "/launch.py"             55 seconds ago
Up 54 seconds (health: starting)   22/tcp, 80/tcp, 443/tcp, 830/tcp, 5000/tcp, 10000-10099/tcp, 161/udp          veos1
If all worked you should immediately get back Container ID. After that we can check if container is running with commands docker ps.
In our case container is up but it’s not ready yet, this is because we have (health: starting) in the output of docker ps command. Vrnetlab builds Docker images with a healthcheck script which allows us to check if container is fully up and ready for action.
With vEOS it usually takes around 3 minutes for the container to be fully up. This time will most likely be different for other images.
przemek@quark:~/netdev/vrnetlab$ docker ps | grep veos1
c62299c4785f        veos:4.18.10M             "/launch.py"             3 minutes ago       Up 3 minutes (healthy)   22/tcp, 80/tcp, 443/tcp, 830/tcp, 5000/tcp, 10000-10099/tcp, 161/udp          veos1
Here we go, we can see that our virtual device is fully up and ready now.
So what’s next? We should probably log into the device and play around, right?
Wait, but how do we do that? Read on to find out!
Helper bash functions
Vrnetlab comes with few useful functions defined in file vrnetlab.sh. If you use bash as your shell you can load these with command . vrnetlab.sh or source vrnetlab.sh. If that doesn't work you'll have to consult manual for your shell.
przemek@quark:~/netdev/vrnetlab$ ls | grep vrnet
vrnetlab.sh

przemek@quark:~/netdev/vrnetlab$ . vrnetlab.sh
Once your shell loaded the functions you should have access to the below commands.
-
vrcons CONTAINER_NAME- Connects to the console of your virtual device.przemek@quark:~$ vrcons veos1 Trying 172.17.0.4... Connected to 172.17.0.4. Escape character is '^]'. localhost# -
vrssh CONTAINER_NAME [USERNAME]- Login to your device via ssh. If USERNAME is not provided defaultvrnetlabusername is used with default password beingVR-netlab9.Default user:
przemek@quark:~$ vrssh veos1 Last login: Wed Aug 19 19:19:07 2020 from 10.0.0.2 localhost>who Line User Host(s) Idle Location 1 con 0 admin idle 00:04:25 - * 2 vty 7 vrnetlab idle 00:00:05 10.0.0.2Custom username:
przemek@quark:~$ vrssh veos1 przemek Password: localhost> -
vrbridge DEVICE1 DEV1_PORT DEVICE2 DEV2_PORT- Creates connection between interface DEV1_PORT on DEVICE1 and interface DEV2_PORT on DEVICE2.przemek@quark:~$ vrbridge veos1 3 veos2 3 ae8e6807e3817eaa05429a9357ffb887a27ddf844f06be3b293ca92a6e9d4103 przemek@quark:~$ docker ps CONTAINER ID IMAGE COMMAND CREATED STATUS PORTS NAMES ae8e6807e381 vr-xcon "/xcon.py --p2p veos…" 3 seconds ago Up 2 seconds bridge-veos1-3-veos2-3 -
vr_mgmt_ip CONTAINER_NAME- Tells you what IP was assigned to CONTAINER_NAME.przemek@quark:~$ vr_mgmt_ip veos1 172.17.0.4
All of these are very helpful but we’ll mostly be using vrcons and vrbridge in this post.
Accessing devices
Now that we have helper functions loaded into our shell we can access the device.
We’ll use vrcons command to connect to the console of our virtual router:
przemek@quark:~/netdev/vrnetlab$ vrcons veos1
Trying 172.17.0.4...
Connected to 172.17.0.4.
Escape character is '^]'.
localhost#sh ver
Arista vEOS
Hardware version:
Serial number:
System MAC address: 5254.0094.eeff
Software image version: 4.18.10M
Architecture: i386
Internal build version: 4.18.10M-10003124.41810M
Internal build ID: f39d7d34-f2ee-45c5-95a3-c9bd73696ee3
Uptime: 34 minutes
Total memory: 1893312 kB
Free memory: 854036 kB
localhost#
Well, well, look at that, we’re in and everything looks to be in order!
Personally I often do just that, launch a container, test a few commands and I’m out. I just love how quickly you can spin up a test device and then get rid of it after you’re done. There’s hardly anything involved in the setup. You just need to wait a few minutes and it’s all ready for you.
Great, we built container with virtual vEOS, we brought it up and managed to run some commands. But while that can be great for quickly labbing up some commands, we want more, we want to connect virtual devices together. After all that’s what networking is about right? Connect all the things!
Connecting devices together
Before we do anything else, let’s get second container up so that it’s ready when we need it:
przemek@quark:~/netdev/vrnetlab$ docker run -d --name veos2 --privileged veos:4.18.10M
fdd6acadacfea340be16fb47757913d3d9cb803f72bdad6fe7276a6b626c325a
To create connections between devices we need to build special Docker image, called vr-xcon. Containers using this image will provide connectivity between our virtual routes.
To build this image enter directory with vrnetlab repo and then navigate into vr-xcon directory. Once you’re in the directory type make. Vrnetlab scripts will do the rest.
przemek@quark:~/netdev/vrnetlab/vr-xcon$ make
docker build --build-arg http_proxy= --build-arg https_proxy= -t vrnetlab/vr-xcon .
Sending build context to Docker daemon 34.3kB
Step 1/6 : FROM debian:stretch
---> 5df937d2ac6c
Step 2/6 : MAINTAINER Kristian Larsson <kristian@spritelink.net>
---> Using cache
---> a5bf654bbf7c
Step 3/6 : ENV DEBIAN_FRONTEND=noninteractive
---> Using cache
---> 6d2b8962f440
Step 4/6 : RUN apt-get update -qy && apt-get upgrade -qy && apt-get install -y bridge-utils iproute2 python3-ipy tcpdump telnet && rm -rf /var/lib/apt/lists/*
---> Running in d3df4c947d25
... (cut for brevity)
Removing intermediate container d3df4c947d25
---> fbc93d1624f4
Step 5/6 : ADD xcon.py /
---> 4cb6b8a3c55a
Step 6/6 : ENTRYPOINT ["/xcon.py"]
---> Running in 186f13b11bd8
Removing intermediate container 186f13b11bd8
---> bd1542effee7
Successfully built bd1542effee7
Successfully tagged vrnetlab/vr-xcon:latest
And to confirm that image is now available:
przemek@quark:~$ docker images | grep xcon
vrnetlab/vr-xcon latest bd1542effee7 21 hours ago 152MB
We just need to change its name to just vr-xcon to make it work with Vrnetlab scripts.
przemek@quark:~$ docker tag vrnetlab/vr-xcon:latest vr-xcon
przemek@quark:~$ docker images | grep "^vr-xcon"
vr-xcon latest bd1542effee7 22 hours ago 152MB
Perfect, our veos2 container should be up too now:
przemek@quark:~$ docker ps | grep veos2
7841eb2dd336 veos:4.18.10M "/launch.py" 4 minutes ago Up 4 minutes (healthy) 22/tcp, 80/tcp, 443/tcp, 830/tcp, 5000/tcp, 10000-10099/tcp, 161/udp veos2
Time to connect veos1 to veos2, let's do it the hard way first and then I'll show you the easy way.
przemek@quark:~$ docker run -d --name vr-xcon --link veos1 --link veos2 vr-xcon --p2p veos1/2--veos2/2
bfe3f53cb14d6d6c6d2800a7542f8a0bad6c7347c16a313f9812ed86ef808c3f
Below is the breakdown of the command.
docker run -d - This tells docker to run container in the background.
--name vr-xcon - We want our container to be named vr-xcon, you can call it something different if you want.
--link veos1 --links veos2 - Here we tell Docker to connect vr-xcon to veos1 and veos2 containers. This allows them to discover and talk to each other.
vr-xcon - Second reference to vr-xcon is the name of the image to run.
--p2p veos1/2--veos2/2 - Finally we have arguments that are passed to vr-xcon container. Here we ask for point-to-point connection between veos1 port 2 and veos2 also port 2. Port 1 maps to Management port so port 2 will be Ethernet1 inside the virtual router.
Hopefully you can now see how it all ties together. To confirm container is up and running we'll run docker ps and we'll check container logs.
przemek@quark:~$ docker ps | grep xcon
bfe3f53cb14d vr-xcon "/xcon.py --p2p veos…" 9 minutes ago Up 9 minutes vr-xcon
przemek@quark:~$ docker logs vr-xcon
przemek@quark:~$
Looks promising, container is up and logs are empty, so no errors reported.
But what is that easy way you ask? Remember the vrbridge helper function? We could use that instead:
przemek@quark:~$ vrbridge veos1 2 veos2 2
83557c0406995b17be306cbc365a9c911696221b0542ba2fbb7cdeaf9b442426
przemek@quark:~$ docker ps | grep bridge
83557c040699 vr-xcon "/xcon.py --p2p veos…" 38 seconds ago Up 38 seconds bridge-veos1-2-veos2-2
So that works as well. But you can only use it to create one link between two devices. I use it for quickly creating single links. For more involving jobs I use vr-xcon directly, that's why I wanted to show you exactly how it work.
In any case, we got link in place and we're ready to log into devices and confirm if our newly created connection is up.
We'll configure hostnames so that output from LLDP check includes them. We'll then configure IPs and try pinging across.
przemek@quark:~$ vrcons veos1
Trying 172.17.0.4...
Connected to 172.17.0.4.
Escape character is '^]'.

localhost#conf t
localhost(config)#host veos1
veos1(config)#int eth1
veos1(config-if-Et1)#no switch
veos1(config-if-Et1)#ip add 10.10.0.0/31
veos1(config-if-Et1)#end
veos1#sh lldp ne
Last table change time : 0:00:17 ago
Number of table inserts : 1
Number of table deletes : 0
Number of table drops : 0
Number of table age-outs : 0
Port Neighbor Device ID Neighbor Port ID TTL
Et1 veos2 Ethernet1 120
veos1#ping 10.10.0.1
PING 10.10.0.1 (10.10.0.1) 72(100) bytes of data.
80 bytes from 10.10.0.1: icmp_seq=1 ttl=64 time=788 ms
80 bytes from 10.10.0.1: icmp_seq=2 ttl=64 time=168 ms
80 bytes from 10.10.0.1: icmp_seq=3 ttl=64 time=176 ms
80 bytes from 10.10.0.1: icmp_seq=4 ttl=64 time=108 ms
80 bytes from 10.10.0.1: icmp_seq=5 ttl=64 time=28.0 ms
--- 10.10.0.1 ping statistics ---
5 packets transmitted, 5 received, 0% packet loss, time 2728ms
rtt min/avg/max/mdev = 28.002/253.615/788.050/272.424 ms, ipg/ewma 682.042/508.167 ms
veos1#
przemek@quark:~$ vrcons veos2
Trying 172.17.0.5...
Connected to 172.17.0.5.
Escape character is '^]'.

localhost#conf t
localhost(config)#host veos2
veos2(config)#int e1
veos2(config-if-Et1)#no switch
veos2(config-if-Et1)#ip add 10.10.0.1/31
veos2(config-if-Et1)#end
veos2#sh lldp ne
Last table change time   : 0:01:37 ago
Number of table inserts  : 1
Number of table deletes  : 0
Number of table drops    : 0
Number of table age-outs : 0

Port       Neighbor Device ID               Neighbor Port ID           TTL
Et1        veos1                            Ethernet1                  120
veos2#ping 10.10.0.0
PING 10.10.0.0 (10.10.0.0) 72(100) bytes of data.
80 bytes from 10.10.0.0: icmp_seq=1 ttl=64 time=708 ms
80 bytes from 10.10.0.0: icmp_seq=2 ttl=64 time=148 ms
80 bytes from 10.10.0.0: icmp_seq=3 ttl=64 time=52.0 ms
80 bytes from 10.10.0.0: icmp_seq=4 ttl=64 time=796 ms
80 bytes from 10.10.0.0: icmp_seq=5 ttl=64 time=236 ms

--- 10.10.0.0 ping statistics ---
5 packets transmitted, 5 received, 0% packet loss, time 2484ms
rtt min/avg/max/mdev = 52.003/388.024/796.050/304.145 ms, pipe 2, ipg/ewma 621.038/548.983 ms
veos2#
Look at that! LLDP shows that both devices can see each other. Ping also works with no problems. Fully virtualized lab running in Docker, pretty neat :)
Here we used vr-xcon to create one connection between two devices but you can use single container to connect multiple devices. Or you can use however many containers you want, each providing just one connection, as long as names of the containers are different
What you do depends on your strategy and what you’re trying to achieve. Multiple containers providing connections can make more sense if you plan on simulating links going hard down. You can even start vr-xcon containers with mix of connections that reflect particular failure scenario that you want to test.
Some examples to show you different options.
Creating three links between three devices using one container:
docker run -d --name vr-xcon --link veos1 --link veos2 --link veos3 vr-xcon --p2p veos1/2--veos2/2 veos1/10--veos3/10 veos2/5-veos3/5
And same links created using three instances of vr-xcon container:
docker run -d --name vr-xcon1 --link veos1 --link veos2 vr-xcon --p2p veos1/2--veos2/2
docker run -d --name vr-xcon2 --link veos1 --link veos3 vr-xcon --p2p veos1/10--veos3/10
docker run -d --name vr-xcon3 --link veos2 --link veos3 vr-xcon --p2p veos2/5-veos3/5
Finally, to remove links, or links, you stop/remove the container used to create connections.
przemek@quark:~$ docker rm -f vr-xcon
vr-xcon
For completeness, it's worth mentioning that vr-xcon also provides tap mode with --tap-listen argument. This allows other apps to be used with virtual routers. See Readme for vr-xcon in Vrnetlab repo for more details.
After you're done with your lab and want to get rid of container you should run docker rm -f command.
docker rm -f veos1 veos2
And with that your containers will be gone.
Bring up pre-defined topology with Docker Compose
You should now know how to bring containers by hand and how to connect them. It can get a bit tedious though if you often bring up the same topology for testing. Why not write some kind of lab recipe that we can launch with single command? Well, we can do that and we will!
There are many ways that you can achieve this and for our example we will use Docker Compose. We'll create docker-compose.yml file that will bring up two virtual images and connect them together. As a bonus we will expose our virtual devices to the external world. This could be useful for remote labbing.
Note: If you don't have docker-compose installed you can get it by running sudo apt install docker-compose in Ubuntu. Other distros should have it readily available as well.
Compose uses docker-compose.yml file to define services to be run together.
I wrote one such file that will bring 2 vEOS devices with one link between them:
przemek@quark:~/netdev/dcompose/veos-lab$ cat docker-compose.yml
version: "3"

services:
  veos1:
    image: veos:4.18.10M
    container_name: veos1
    privileged: true
    ports:
      - "9001:22"
    network_mode: default
  veos2:
    image: veos:4.18.10M
    container_name: veos2
    privileged: true
    ports:
      - "9002:22"
    network_mode: default
  vr-xcon:
    image: vr-xcon
    container_name: vr-xcon
    links:
      - veos1
      - veos2
    command: --p2p veos1/2--veos2/2
    depends_on:
      - veos1
      - veos2
    network_mode: default
If it's the first time you see docker-compose.yml don't worry, I'm breaking it down for you below.
-
First line defines version of Compose format,
version: "3"is pretty old but is widely supported. -
In
servicessection we define three containers that we want to be launched. First off we defineveos1service.veos1: image: veos:4.18.10M container_name: veos1 privileged: true ports: - "9001:22" network_mode: defaultveos1- Name of our service where we define container.image: veos:4.18.10M- We want our container to useveos:4.18.10Mimage.container_name: veos1- Override default container name to make it easier to refer to later.privileged: true- We need privileged mode for KVM.ports:- We tell Docker Compose to use host port 9001 to connect to port 22 in container.
network_mode: default- We ask Compose to use default Docker bridge, by default Docker Compose would create separate network and Vrnetlab doesn't like it.
-
Definition for
veos2is same except we map port 22 to port 9002 on host. -
Finally, we have
vr-xconservice. Items of note here:links:- Equivalent to--linkargument we used when running container by hand. Listed containers will be linked tovr-xconcontainer.command: --p2p veos1/2--veos2/2- This is how command is passed to container when using Docker Compose.
depends_on:- We tell Compose to wait for the listed service, hereveos1andveos2, before starting vr-xcon service.
With all that in place we're ready to launch our virtual lab using docker-compose up -d command, run in the directory that contains docker-compose.yml. Options -d makes Compose run in background.
przemek@quark:~/netdev/dcompose/veos-lab$ docker-compose rm
No stopped containers
przemek@quark:~/netdev/dcompose/veos-lab$ docker-compose up -d
Creating veos2 ... done
Creating veos1 ... done
Creating vr-xcon ... done
Now to check if containers are running:
przemek@quark:~/netdev/dcompose/veos-lab$ docker ps
CONTAINER ID        IMAGE                     COMMAND                  CREATED             STATUS                    PORTS                                                                                NAMES
0ec9b3e8d4e9        vr-xcon                   "/xcon.py --p2p veos…"   30 minutes ago      Up 29 minutes                                                                                                  vr-xcon
3062da1b3417        veos:4.18.10M             "/launch.py"             30 minutes ago      Up 29 minutes (healthy)   80/tcp, 443/tcp, 830/tcp, 5000/tcp, 10000-10099/tcp, 161/udp, 0.0.0.0:9001->22/tcp   veos1
4e81f0de7be7        veos:4.18.10M             "/launch.py"             30 minutes ago      Up 29 minutes (healthy)   80/tcp, 443/tcp, 830/tcp, 5000/tcp, 10000-10099/tcp, 161/udp, 0.0.0.0:9002->22/tcp   veos2
Now we're talking! Entire mini lab launched with one command! And now that you know how this works you can extend the docker-compose.yml file to your liking. Want more devices? No problem, we'll define new veos service. Need extra links? Just define more services or add arguments to an existing one.
Let's quickly connect to the devices and configure hostnames. This will prove we can access them and it will help us identify devices later.
przemek@quark:~/netdev/dcompose/veos-lab$ vrcons veos1
Trying 172.17.0.5...
Connected to 172.17.0.5.
Escape character is '^]'.

localhost#conf t
localhost(config)#hostname veos1
veos1(config)#end
veos1#
telnet> quit
Connection closed.
przemek@quark:~/netdev/dcompose/veos-lab$ vrcons veos2
Trying 172.17.0.4...
Connected to 172.17.0.4.
Escape character is '^]'.

localhost#conf t
localhost(config)#hostname veos2
veos2(config)#end
veos2#
telnet> quit
Connection closed.
Yup, all accessible, no problems here.
Accessing lab from outside
You might remember that I exposed port TCP22 on both of our devices. I then mapped it to local ports 9001 and 9002 for veos1 and veos2 respectively.
przemek@quark:~/netdev/dcompose/veos-lab$ sudo lsof -nP -iTCP -sTCP:LISTEN | grep 900[12]
docker-pr 20748            root    4u  IPv6 179906      0t0  TCP *:9002 (LISTEN)
docker-pr 20772            root    4u  IPv6 185480      0t0  TCP *:9001 (LISTEN)
There we have it, two TCP ports, 9001 and 9002, listening on our machine.
przemek@quark:~/netdev/dcompose/veos-lab$ ip -4 a show dev ens33
2: ens33: <BROADCAST,MULTICAST,UP,LOWER_UP> mtu 1500 qdisc fq_codel state UP group default qlen 1000
    inet 192.168.5.128/24 brd 192.168.5.255 scope global dynamic noprefixroute ens33
       valid_lft 1590sec preferred_lft 1590sec
IP address of interface on my VM is 192.168.5.128. So we have ports, we have IP, we should be able to connect right? Let's give it a go :)
I added entries for both of the devics to my terminal app in Windows.
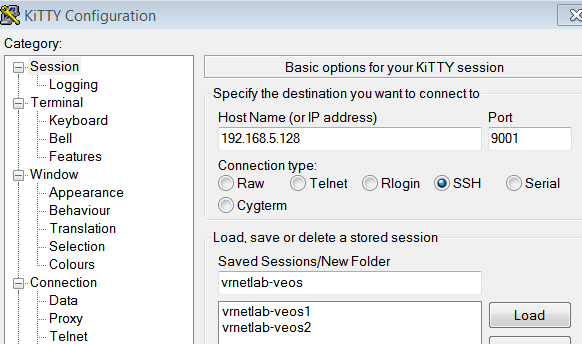
Let's try veos1 first.
Hey, we managed to access our virtual device running in a Docker Container over the network! You can see that it is running virtual image and it can see veos2 on one of its interfaces.
But, can we connect to veos2 as well?
Oh yes, we can :) Again, it's running virtual image and can see veos1. These are most definetely the boxes we brought up with Docker Compose.
And think what you can already do with that. You can create a job in Jenkins building the entire lab for you when you make your morning coffee. It will all be ready and accessible over the network when you come back to your desk.
There's tremendous value and potential there for sure.
Finally, once you're done and want your lab to go away, you again need only one command, this time docker-compose down. This will stop the services defined in docker-compose.yml file and will remove them completely.
przemek@quark:~/netdev/dcompose/veos-lab$ docker-compose down
Stopping veos-lab_vr-xcon_1 ... done
Stopping veos2              ... done
Stopping veos1              ... done
Removing veos-lab_vr-xcon_1 ... done
Removing veos2              ... done
Removing veos1              ... done
Conclusion
With that, we've come to an end of this post. I hope what you've seen here makes you as excited about Vrnetlab as I am. It might not have pretty GUI of other existing solutions out there, but it has its own unique strengths that I think make it better suited for Network Automation.
Once you built your collection of Docker images with virtual appliances it doesn't take much time to build your lab. Most importantly, you can describe your topology using code and store these files in GIT repository. This allows you to have multiple versions and track changes between deployments.
And that's not all. I have another post coming where I will use Vrnetlab with Ansible to build Network Automation CI pipelines. We'll have more code and more automation! I'm looking forward to that and I hope that you do too :)
References
-
Vrnetlab GitHub repository: https://github.com/plajjan/vrnetlab
-
Michael Kashin shows you how to run Vrnetlab at scale with Kubernetes: https://networkop.co.uk/post/2019-01-k8s-vrnetlab/
-
Other great post on Vrnetlab, has pretty diagrams: https://www.brianlinkletter.com/vrnetlab-emulate-networks-using-kvm-and-docker/
-
GitHub repo with resources for this post. Available at: https://github.com/progala/ttl255.com/tree/master/vrnetlab/vrnetlab-router-in-docker