
This is first post in my series showing how to develop NetBox plugin. We'll talk about what NetBox plugins are and why would you want one. Then I'll show you how to set up development environment. We'll finish by building base version of our custom plugin.
Developing NetBox Plugin tutorial series
- Developing NetBox Plugin - Part 1 - Setup and initial build
- Developing NetBox Plugin - Part 2 - Adding web UI pages
- Developing NetBox Plugin - Part 3 - Adding search panel
- Developing NetBox Plugin - Part 4 - Small improvements
- Developing NetBox Plugin - Part 5 - Permissions and API
Contents
- What are NetBox plugins?
- Why plugins?
- Development environment set-up
- Our plugin - BGP Peering
- Adding menu entry
- Data model
- Model Migrations
- Conclusion
- Resources
- BGP Peering Plugin repository
What are NetBox plugins?
NetBox plugins are small, self-contained, applications that add new functionality. This could range from adding new API endpoint to fully fledged apps. These apps can provide their own data models, views, background tasks and more. We can also inject content into existing model pages. NetBox added plugin support in version 2.8.
Plugins can access existing objects and functionality of NetBox. This allows them to integrate with NetBox's look and feel. Apps can also use any libraries, external resources, and API calls thy want. One of restrictions is that we're not allowed to change existing NetBox's models. That would break the rule of plugins being self-contained reusable apps.
Under the hood plugins are Django apps. This means most of the resources on this topic available on the web can be used for creating NetBox plugins.
You can alredy find on the net plugins created by community. I included links to some in References.
Why plugins?
NetBox is a very focused project. This allowed it to provide high quality functionality without getting too bloated. Features provided by the core are what majority of user base needs and uses.
New features that are not widely used would take up time that maintainers have in short supply. Instead this time can be used on improving the core. Some requirements are also so specific that they wouldn't fit in the standard model.
For that reason NetBox's maintainers came up with the awesome idea of plugin system. Users can create self-contained plugins adding required functionality.
With plugins you can have your own data models, new APIs, etc. be part of NetBox with no need for custom fork. You can write your own app and iterate it at your pace. If you want, you can can share that app with community. It can then be installed in NetBox like you would install any Python package.
In other words, endless possibilities for building cool stuff!
Development environment set-up
Before we start working on our plugin I'll show you my development setup. You can use your own setup if you have one, but you might find some inspiration here.
Prerequisites
I'm using NetBox 2.9+ with Python 3.8.5 under Ubuntu 20.04 and have following two Python utilities installed in userspace:
- poetry
- invoke
Poetry is used to manage dependencies and packaging of our app.
Invoke is a pure Python alternative to make. This allows us to define and execute commonly run tasks.
You will also need to have installed the Docker engine and the Docker Compose utility. These are used to run development environment in the container.
Note: When installing Poetry on Ubuntu20.04 I had to install below package to force Poetry to user Python 3 during its install:
apt install python-is-python3
See more details here: https://wiki.ubuntu.com/FocalFossa/ReleaseNotes#Python3_by_default
Setting up application package
With poetry and invoke in place we can start building scaffolding for our plugin.
- Create, and change into, directory where you'll keep plugin:
$ mkdir ttl255-netbox-plugin-bgppeering && cd ttl255-netbox-plugin-bgppeering
- Activate Python virtual environment with
poetry:
..ttl255-netbox-plugin-bgppeering$ poetry shell
Your prompt should change to let you know you're inside of Python Venv, see example below:
(ttl255-netbox-plugin-bgppeering-6_wYw8eP-py3.8) \
        przemek@quark:~/netdev/ttl255-netbox-plugin-bgppeering$
- Inside of plugin directory ask
poetryto initialize your package withpoetry init:
..ttl255-netbox-plugin-bgppeering$ poetry init

This command will guide you through creating your pyproject.toml config.

Package name [ttl255-netbox-plugin-bgppeering]:
Version [0.1.0]:
Description []:  NetBox Plugins - adds BGP Peering model
Author [None, n to skip]:  Przemek Rogala (ttl255.com)
License []:  Apache-2.0
Compatible Python versions [^3.8]:

Would you like to define your main dependencies interactively? (yes/no) [yes] no
Would you like to define your development dependencies interactively? (yes/no) [yes] no
Generated file

[tool.poetry]
name = "ttl255-netbox-plugin-bgppeering"
version = "0.1.0"
description = "NetBox Plugins - adds BGP Peering model"
authors = ["Przemek Rogala (ttl255.com)"]
license = "Apache-2.0"

[tool.poetry.dependencies]
python = "^3.8"

[tool.poetry.dev-dependencies]

[build-system]
requires = ["poetry-core>=1.0.0"]
build-backend = "poetry.core.masonry.api"


Do you confirm generation? (yes/no) [yes] yes
As you can see above you will be asked a few questions about your package. You need to provide name, version, description, etc. Once you're happy with everything poetry will generate pyproject.toml file with details of your package.
I used long name for my package to give it namespace and descriptive name in case I wanted to push it out to PyPi. It's unlikely that anyone else would use this name for the package.
When plugin is added to NetBox I want to use shorter name. I'm going to show you how to do it.
- Create directory with name that will be used when importing package:
..ttl255-netbox-plugin-bgppeering$ mkdir netbox_bgppeering
I want my plugin to be called netbox_bgppeering when it's added in NetBox. Directory we just created will store source code of our plugin.
- Tell
poetryto include package innetbox_bgppeeringdirectory:
We add the below to the [tool.poetry] config section in pyproject.toml:
packages = [
    { include = "netbox_bgppeering" },
]
Now when our plugin is imported it can be referred by netbox_bgppeering package name.
- Next we tell
poetryto add Python libraries that are used during development:
..ttl255-netbox-plugin-bgppeering$ poetry add bandit black invoke \
        pylint pylint-django pydocstyle yamllint --dev
All these packages will be added to dev dependencies in pyproject.toml. Poetry will also create new file poetry.lock. In there your dependencies are described in details and locked to specific versions. This allows you and other developers to recreate your Python environment.
- Add
invoketasks and environment build files:
Now we can take advantage of great work done by Network To Code folks. We'll borrow some files from NetBox Onboarding plugin. These will greatly help with standing up and managing development environment.
Navigate to or clone the repo https://github.com/networktocode/ntc-netbox-plugin-onboarding
Note: Repository is under Apache-2.0 license. Don't forget to keep relevant copyright information like license headers etc. if you intend to release work based on it.
Below are the files that I copied over, and use, in my workspace:
tasks.py
development/*
- Update plugin and Docker image names in
tasks.pyanddevelopment/*files:
You will need to review and update names of the plugin, Docker image, etc. in the following files. These should match the name of your plugin.
tasks.pydevelopment/docker-compose.yml
My repo has these files if you want to see how I've done it.
- Add your plugin to NetBox configuration file:
Find the PLUGINS and PLUGINS_CONFIG settings in development/base_configuration.py and add your plugin there.
You use first setting to enable your plugin. Second one is used to pass configuration settings expected by your plugin.
I don't currently have any setting so I'm using empty values here.
PLUGINS = ["netbox_bgppeering"]

PLUGINS_CONFIG = {"netbox_bgppeering": {}}
With all that in place we can start building our plugin.
Our plugin - BGP Peering
For this blog series I'm building plugin that can record details of BGP peers.
The idea is to be able to record and track information on BGP peer connections. I want to be able to keep the below details on each of the peers I have a BGP sessions with:
- Site (DC, etc.) where this peer connects
- Device on which peering takes place
- Local IP which we use for peering
- Local AS number we use for peering
- Remote IP that our peer uses
- Remote AS that peer uses
- Peer name
- Description to add more context
Some of that information that doesn't fit into NetBox's standard model. This is a perfect use case for writing plugin and custom models.
Initializing plugin - PluginConfig
First thing we need to do when writing NetBox plugin is to create plugin config. This goes into __init__.py file in plugin's directory. Most of the plugins will inherit from PluginConfig class, unless they have some special requirements.
In my case I created class BgpPeering that subclasses PluginConfig:
__init__.py
from extras.plugins import PluginConfig


class BgpPeering(PluginConfig):
    name = "bgp_peering"
    verbose_name = "BGP Peering"
    description = "Manages BGP peer connections"
    version = "0.1"
    author = "Przemek Rogala (ttl255.com)"
    author_email = "pr@ttl255.com"
    base_url = "bgp-peering"
    required_settings = []
    default_settings = {}


config = BgpPeering
This class has a number of attributes that describe our plugin. The important ones are:
name- this is the name of your plugin and it has to match the name of your package as defined inpoetry.tomlfile.verbose_name- human friendly name of the plugin.description- short description of what our plugin does.base-url- this defines base URL for our plugin that is appended to/plugin/NetBox URL.required_settings- this a list of settings that must be defined by user of the plugin.default_settings- here you include dictionary with plugin settings and their default values.
I have no settings at the moment but wanted to include attributes already in case I find need for them later.
Note: I'm only using a subset of attributes. For full list of attributes refer to official docs https://netbox.readthedocs.io/en/stable/plugins/development/
If you want to follow along I created git branch with all the code we created up until this point: https://github.com/progala/ttl255-netbox-plugin-bgppeering/tree/initial-plugin
Kick off the initial build
With plugin config in place we can run initial build of our NetBox dev environment using invoke build command.
..ttl255-netbox-plugin-bgppeering$ invoke build

... (cut fo brevity)

Successfully built 228ef14eb72b
Successfully tagged ttl255-netbox-plugin-bgppeering/netbox:master-py3.8
Once the command finished executing you should have a set of containers that will allow us to spin up NetBox for testing and iterating our plugin.
With build in place we should bring NetBox up for the first time. We can either use invoke start to run it in the background or invoke debug and see all console messages in our shell.
I'm going to run invoke start.
..ttl255-netbox-plugin-bgppeering$ invoke start
Starting Netbox in detached mode..
Creating network "netbox_bgppeering_default" with the default driver
Creating volume "netbox_bgppeering_pgdata_netbox_bgppeering" with default driver
Creating netbox_bgppeering_redis_1    ... done
Creating netbox_bgppeering_postgres_1 ... done
Creating netbox_bgppeering_netbox_1   ... done
Creating netbox_bgppeering_worker_1   ... done
You can check with docker ps if all containers are running:
..ttl255-netbox-plugin-bgppeering$ docker ps
CONTAINER ID        IMAGE                                                 COMMAND                  CREATED              STATUS                   PORTS                                                                         NAMES
0a97b5d04b86        ttl255-netbox-plugin-bgppeering/netbox:master-py3.8   "sh -c 'python manag…"   28 seconds ago       Up 27 seconds                                                                                          netbox_bgppeering_worker_1
07075c544b52        ttl255-netbox-plugin-bgppeering/netbox:master-py3.8   "sh -c 'python manag…"   28 seconds ago       Up 27 seconds            0.0.0.0:8000->8000/tcp                                                        netbox_bgppeering_netbox_1
7096a4a8a643        postgres:10                                           "docker-entrypoint.s…"   About a minute ago   Up 28 seconds            5432/tcp                                                                      netbox_bgppeering_postgres_1
1ce3bf4834b4        redis:5-alpine                                        "docker-entrypoint.s…"   About a minute ago   Up 28 seconds            6379/tcp                                                                      netbox_bgppeering_redis_1
With all that in place we should now create superuser account. This will allow us access to admin panel.
..ttl255-netbox-plugin-bgppeering$ invoke create-user --user ttl255

Email address:
Password:
Password (again):
Superuser created successfully.
And now time for the big moment. If everything worked as it should you can navigate to http://localhost:8000/ and login with you superuser credentials.
Once you're logged in you might wonder if our plugin made it to Netbox. We can't see anything extra, as we didn't really create anything substantial.
But don't worry, there's a way to check it if plugin is there.
Navigate to admin > System - Installed plugins.
And tada, it's here!
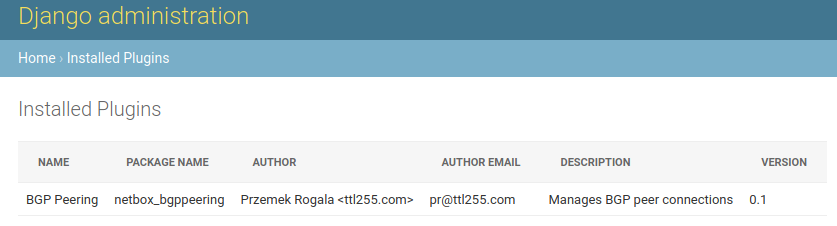
It's quite exciting. We just added some extra stuff to NetBox!
But as much fun as it is, it'd be nice if we could actually see this plugin in action.
Adding menu entry
I'm going to add a menu entry for our plugin. This will prove that we can add new elements to GUI and it'll give us something tangible.
- First we'll create
url.pywhich Django, and NetBox, use to map URLs used by our plugin to code that generates content for these URLs.
urls.py
from django.<a href="http" target="_blank">http</a> import HttpResponse
from django.urls import path


def dummy_view(request):
    html = "<html><body>BGP Peering plugin.</body></html>"
    return HttpResponse(html)


urlpatterns = [
    path("", dummy_view, name="bgppeering_list"),
]
For now we have just one URL, an empty string. This is root URL of our plugin accessible at <netbox-url>/plugins/bgp-peering/.
I named link bgppeering_list to allow us to refer to this URL later by a convenient name instead of hardcoding it.
I also created temporary function dummy_view returning dummy content. This will allow us to test the link.
- Next we'll create file
navigation.pywhere menu elements used by our plugin have to go.
navigation.py
from extras.plugins import PluginMenuItem


menu_items = (
    PluginMenuItem(
        link="plugins:netbox_bgppeering:bgppeering_list",
        link_text="BGP Peerings",
    ),
)
Here we are adding single element to our plugin's menu. We define display name in link_text variable and link variable points to URL we defined in urls.py. You can see here that we used previously defined name bgppeering_list.
Class we imported here, PluginMenuItem, comes from NetBox.
The link name is automatically put in the namespace plugins:<plugin_name> where <plugin_name> is the name we defined in PluginConfig in __init__.py. This is why the final URL name we used is plugins:netbox_bgppeering:bgppeering_list.
With these menu item and url in place we can rebuild the image and bring it up for testing.
...ttl255-netbox-plugin-bgppeering$ invoke stop
...ttl255-netbox-plugin-bgppeering$ invoke build
...ttl255-netbox-plugin-bgppeering$ invoke start
After few seconds NetBox should be up again. Navigate to it and check the top menu bar.
Look at that! Our plugin shows in the plugins top menu with the menu item we defined.

When we click on the menu item we will get text only response from our dummy function.

That's pretty cool. We have a plugin that shows up in NetBox and can actually do something!
All the code up to this point is in branch minimal-plugin if you want to check it out: https://github.com/progala/ttl255-netbox-plugin-bgppeering/tree/minimal-plugin
Data model
To give our plugin some substance we'll now work on the data model for our plugin.
In the world of Django model is a set of fields and behaviour of the data we want to store. Each model maps to an underlying database table.
As a reminder, these are the attributes I want to have in my data model:
- site - peer connects here
- device - peering takes place here
- local_ip - IP address we use for peering
- local_as - BGP ASN number we use for peering
- remote_ip - IP address our peer uses
- remote_as - BGP ASN number our peer uses
- peer_name - what our peer is called
- description - adds more context about this connection
Looking at the details I want to record, I can see that we can link some of those attributes into NetBox's model. For instance device is something that NetBox already has a model for. Same for local IP, which we'd expect to be assigned to an interface on the device where peering takes place.
What about remote IP? We could link it but I'm not going to at this stage. I don't know yet if I want to force these IPs to be in NetBox. We could always change it later.
Right, so how do we go about creating a model?
In vanilla Django models are classes that sublcass django.db.models.Model. In our case we'll take advantage of NetBox class extras.models.ChangeLoggedModel. This will automatically enable change logging for instances of model.
In Django database models need to be in models.py file, so we'll create that file and record our model there.
model.py
from django.db import models

from dcim.fields import ASNField
from extras.models import ChangeLoggedModel
from ipam.fields import IPAddressField


class BgpPeering(ChangeLoggedModel):
    site = models.ForeignKey(
        to="dcim.Site", on_delete=models.SET_NULL, blank=True, null=True
    )
    device = models.ForeignKey(to="dcim.Device", on_delete=models.PROTECT)
    local_ip = models.ForeignKey(to="ipam.IPAddress", on_delete=models.PROTECT)
    local_as = ASNField(help_text="32-bit ASN used locally")
    remote_ip = IPAddressField(help_text="IPv4 or IPv6 address (with mask)")
    remote_as = ASNField(help_text="32-bit ASN used by peer")
    peer_name = models.CharField(max_length=64, blank=True)
    description = models.CharField(max_length=200, blank=True)
There are a few things to unpack here, so let's run through this in more detail.
First we have a few import statements.
from django.db import models- this is Django module providing us with standard field types likeCharFieldorForeignKey.from extras.models import ChangeLoggedModel- Here we borrow model class defined in NetBox,ChangeLoggedModel.from dcim.fields import ASNField- NetBox definesASNFieldclass that we can use for our BGP AS attributes. This supports both 16 and 32 bit ASNs.from ipam.fields import IPAddressField- Another class provided by NetBox, this one handles IPv4/IPv6 addresses for us.
Next step is creating model class. Here I created class named BgpPeering which subclasses ChangeLoggedModel.
class BgpPeering(ChangeLoggedModel):
Next we have a number of model fields.
-
sitesite = models.ForeignKey( to="dcim.Site", on_delete=models.SET_NULL, blank=True, null=True )Field
sitelinks to NetBox'sdcim.Sitemodel so I made it aForeignKey.null=Trueallows the corresponding database column to be NULL (contain no value).blank=Truemeans this field is optional when appearing in forms.
The above two options basically mean that this field doesn't have to be filled and we can still record objects with it being empty.
on_delete=models.SET_NULLmeans that if NetBox site object to which we link is deleted we will set this field to NULL
-
devicedevice = models.ForeignKey( to="dcim.Device", on_delete=models.PROTECT )Field
deviceis linked todcim.Devicemodel in NetBox.nullandblankattributes are left to defaults meaning that this field is required and cannot be emtpy.- on_delete=models.PROTECT - this means that if the linked device cannot be deleted as long as our object exists
-
local_iplocal_ip = models.ForeignKey( to="dcim.Interface", on_delete=models.PROTECT )This field is linked to
ipam.IPAddressmodel. This field cannot be empty and the linked object can't be deleted. -
local_aslocal_as = ASNField( help_text="32-bit ASN used locally" )Next field,
local_asis ofASNFieldtype. This automatically enforces validity of ASNs. Help text is text that will provide additional context in forms where this field appears. -
remote_ipremote_ip = IPAddressField( help_text="IPv4 or IPv6 address (with mask)" )Field
remote_ipis ofIPAddressFieldtype. This means only valid IPv4 and IPv6 will be allowed here. Help text is provided as well. -
remote_asremote_as = ASNField( help_text="32-bit ASN used by peer" )This field is same as
local_asfield, with slightly different help text. -
peer_nameanddescriptionpeer_name = models.CharField( max_length=64, blank=True ) description = models.CharField( max_length=200, blank=True )Finally
peer_nameanddescriptionfields store string, with max length of 64 and 200 characters respectively. We allow these fields to be empty.This is a pretty basic model that we might have to add to in the future. But for now it will do.
Where do the field types come from?
You might be wondering how did I know that remote_ip can use IPAddressField class. Or that peer_name being string can use CharField.
We can find all standard field classes in Django docs, https://docs.djangoproject.com/en/3.1/ref/models/fields/#field-types, these are fields imported from "django.db.models".
You can also find few custom fields classes in NetBox's source code, https://github.com/netbox-community/netbox Best way to see how it all works is by investigating existing models. You'll learn a lot this way!
Do remember though that stuff you reuse from NetBox might change in the future. Most of the core is stable but keep that in mind.
Adding model to admin panel
We have defined our model but there is no way to interact with it yet. We'll work on forms and APIs in future posts but there's something we can do now.
With little effort we can add this model to admin panel. To do that we need to create file admin.py where admin related code goes.
admin.py
from django.contrib import admin
from .models import BgpPeering


@admin.register(BgpPeering)
class BgpPeeringAdmin(admin.ModelAdmin):
    list_display = ("device", "peer_name", "remote_as", "remote_ip")
We create BgpPeeringAdmin class which subclasses ModelAdmin class. Then we use admin.register decorator to register our BgpPeering model with it.
As a result our model will be accessible in admin panel and we'll be able to interact with it.
But before that happens there's something very important we need to do. We need to create migrations for our model.
Source code up until point is in branch adding-model: https://github.com/progala/ttl255-netbox-plugin-bgppeering/tree/adding-model
Model Migrations
We now defined our model in the code but that needs to be added to database before our plugin can use it.
Migrations are what Django uses to propagate changes we make to our models into database schema. These are like change control for database schema. As our models grow and change migrations help Django keep track of them.
Django provides makemigration commands to help with generating migrations. In our environment we have wrapper for that which we can use by running invoke makemigrations.
Note: I had trouble running makemigrations command on its own. I decided to extend invoke.py by adding extra argument app_name to it. By default this will use value stored in BUILD_NAME variable. By doing that I'm able to specify app for which Django will attempt to generate migrations.
So let's get to it. We'll rebuild our image first. Then we'll run makemigrations command:
...ttl255-netbox-plugin-bgppeering$ invoke build

... (cut for brevity)

...ttl255-netbox-plugin-bgppeering$ invoke makemigrations
netbox_bgppeering_postgres_1 is up-to-date
Starting netbox_bgppeering_postgres_1 ... done
Starting netbox_bgppeering_redis_1    ... done

Migrations for 'netbox_bgppeering':
  /source/netbox_bgppeering/migrations/0001_initial.py
    - Create model BgpPeering

... (cut for brevity)
Well, well. Something cool happened. Django created a directory with migration file containing instructions on how to add our model to database.
Important: We need to distribute this with our plugin package as that's what Djano will use to update NetBox's database.
...ttl255-netbox-plugin-bgp-peering$ tree netbox_bgppeering/migrations/
netbox_bgppeering/migrations/
├── 0001_initial.py
└── __init__.py
Seems we have all pieces of the puzzle in place now. We'll rebuild the image and start environment in debug mode to see if our migrations is applied during startup.
...ttl255-netbox-plugin-bgppeering$ invoke stop

... (cut for brevity)

...ttl255-netbox-plugin-bgppeering$ invoke build

... (cut for brevity)

...ttl255-netbox-plugin-bgppeering$ invoke debug

... (cut for brevity)

netbox_1    | Running migrations:
netbox_1    |   Applying netbox_bgppeering.0001_initial... OK

... (cut for brevity)
There it is! Somewhere in the middle of the log messages we can see our migration being applied. Very cool!
Let's go into admin panel and see if it's there!

Awesome, our model is showing up. Time to create some peering record.
Click on Add button and fill in the form that shows up.
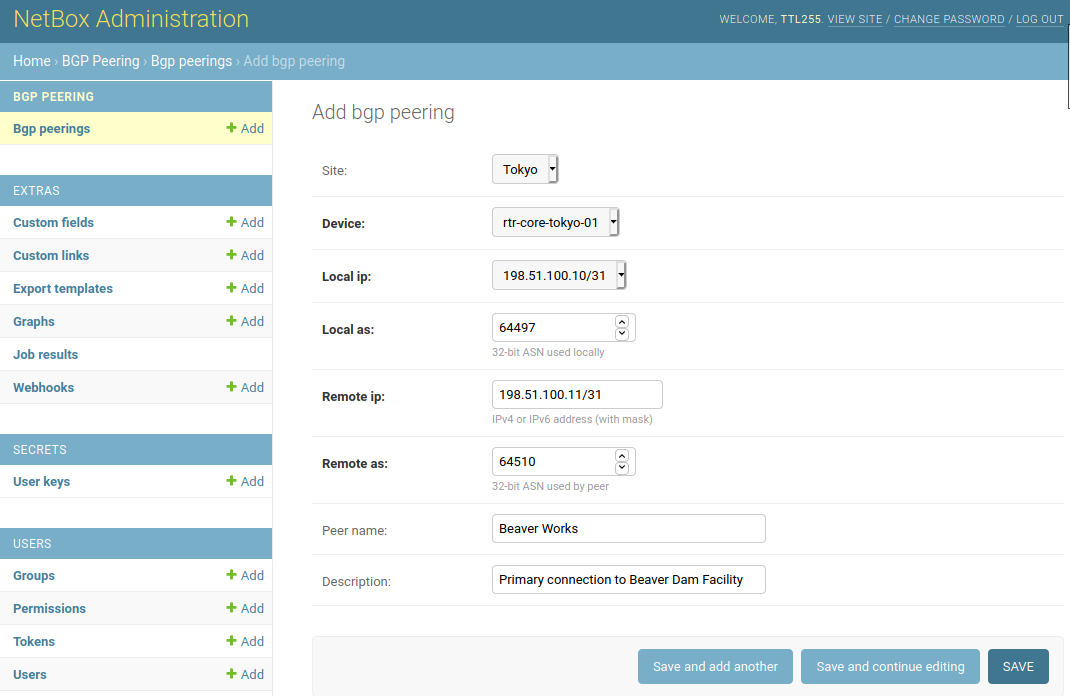
I already had Site, Device and Local ip created in Netbox to allow me to choose these in the drop down menus.
Now just click save and wait for result.

And it's here. Our first BGP Peering connection record got created!
Source code up until this point is in branch model-migrations: https://github.com/progala/ttl255-netbox-plugin-bgppeering/tree/model-migrations
Conclusion
With that we come to the end of first post in the series on developing NetBox plugins. I hope that this post gave you a good idea of what NetBox plugins are and why you would want one.
You've seen how you can setup productive development environment when writing plugins. And you could also see what needs to be done to get your own plugin off the ground.
In the next post I'll show you how we can add templates and views that render them. This will allow us to work with our BGP Peering connections from the main GUI.
I hope you learned something today and I look forward to seeing you again!
Resources
-
NetBox docs: Plugin Development: https://netbox.readthedocs.io/en/stable/plugins/development/
-
NetBox source code on GitHub: https://github.com/netbox-community/netbox
-
NetBox Extensibility Overview, NetBox Day 2020: https://www.youtube.com/watch?v=FSoCzuWOAE0
-
NetBox Plugins Development, NetBox Day 2020: https://www.youtube.com/watch?v=LUCUBPrTtJ4
-
NetBox Onboarding plugin: https://github.com/networktocode/ntc-netbox-plugin-onboarding
-
Netbox QR Code Plugin: https://github.com/k01ek/netbox-qrcode
-
NetBox Virtual Circuit Plugin: https://github.com/vapor-ware/netbox-virtual-circuit-plugin
-
Dynamic DNS Connector for NetBox: https://github.com/sjm-steffann/netbox-ddns
-
Poetry docs: https://python-poetry.org/docs/
-
Invoke docs: http://docs.pyinvoke.org/en/stable/
-
Django models: https://docs.djangoproject.com/en/3.1/topics/db/models/
-
Django model field types: https://docs.djangoproject.com/en/3.1/ref/models/fields/#field-types
-
Django migrations: https://docs.djangoproject.com/en/3.1/topics/migrations/