
Welcome to part 2 of my tutorial walking you through process of developing NetBox plugin. In part 1 we set up our development environment and built base version of Bgp Peering plugin. Here we will continue work on the plugin by adding UI pages allowing us to list, view and add, Bgp Peering objects.
Developing NetBox Plugin tutorial series
- Developing NetBox Plugin - Part 1 - Setup and initial build
- Developing NetBox Plugin - Part 2 - Adding web UI pages
- Developing NetBox Plugin - Part 3 - Adding search panel
- Developing NetBox Plugin - Part 4 - Small improvements
- Developing NetBox Plugin - Part 5 - Permissions and API
Contents
- Adding web UI pages
- Enable model for permissions framework
- Single object view -
BgpPeeringView - Object list view -
BgpPeeringListView - Object creation view -
BgpPeeringCreateView - Conclusion
- Resources
- BGP Peering Plugin repository
Disclaimer
Original version of this post contained views that relied on views used internally by NetBox. This practice is not recommended by NetBox maintainers as these are likely to change in the future and your plugin might stop working.
To add to it, bugs with plugins are often logged against the core NetBox adding to the mainteners' workload even though this has nothing to do with them. I've now refactored these views to decouple this plugin from NetBox's implementation details.
Adding web UI pages
We previously created BgpPeering model which we can even work with from admin panel. This was all for quick testing and we should now expose the model to the end users.
The best way to do that is by adding set of pages to web UI. We're also going to re-use some of the NetBox's components so that our pages match look and feel of core offering.
Here are some of the things we need to work on to make this happen.
- Create template for pages, these go into in
templatesdirectory. - Write code responsible for rendering web response, we store views in
views.pyfile. - Add URLs pointing to our new pages in
urls.py - Add menu items in
navigation.pywhere appropriate. - Create table class in
tables.pyfor list view.
You will see me talking about views in few places. If you've never heard the term before, know that view[1] in Django is Python code that receives web request, executes some logic and returns web response.
In this post I want to create three views:
- view displaying details of single object
- view displaying list of objects
- view with form for adding new object
But before we get to views there is one more thing that we need to do. We need to make our model compatible with NetBox's permissions framework.
Enable model for permissions framework
NetBox has support for granular query permissions. Even though we currently don't use any permissions we want our components to support them. This will make future additions easier to make.
Below is the code I'm adding to models.py.
from utilities.querysets import RestrictedQuerySet

class BgpPeering(ChangeLoggedModel):
  ...
  objects = RestrictedQuerySet.as_manager()
We create class attribute called objects and assign RestrictedQuerySet to it. This will be used for retrieving and filtering BgpPeering records.
RestrictedQuerySet is a class we import from NetBox's utilities. This class provides support for permissions.
By using RestrictedQuerySet NetBox will be able to filter out objects for which user does not have specific rights.
objects is a default name Django uses for db query interface, Manager. Follow hyperlink to footnotes if you want to learn more [2].
Finally as_manager() method is used here to return instance of Manager class. This is a bit low level but know that Django expects to see Manager type here. We used custom QuerySet which as_manager() allows to use as Manager.
With that out of the way we can move to our first view.
Single object view - BgpPeeringView
First view we're going to create has name BgpPeeringView. Choice of names is completely arbitrary but I'm trying to follow naming convention used by NetBox.
This and all other views have to go into views.py file in your plugin's directory.
Also, for our views we'll be using Django class based views. These allow more flexiblity and reuse of code via inheritance compared to function based views[3].
Below is the initial code, which we're going to breakdown in a second.
# views.py
from django.shortcuts import get_object_or_404, render
from django.views import View

from .models import BgpPeering


class BgpPeeringView(View):
    """Display BGP Peering details"""

    queryset = BgpPeering.objects.all()

    def get(self, request, pk):
        """Get request."""
        bgppeering_obj = get_object_or_404(self.queryset, pk=pk)

        return render(
            request,
            "netbox_bgppeering/bgppeering.html",
            {
                "bgppeering": bgppeering_obj,
            },
        )
Let's have a closer look at this code.
-
We subclass
Viewwhich comes from core Django. This is one of the most basic type of class-based views. -
Next we have
querysetwhich we use to retrieve and filter interesting objects. We do this by calling methodall()onobjectsattribute we just defined inBgpPeeringmodel. No database calls are made at this stage so don't be alarmed by use ofall(). -
Method
get()is used to service incoming GET HTTP requests. -
Function
get_object_or_404()returns404HTML code instead of raising internal exception. This is more meaningful to end users. -
Then we're feeding defined queryset to
get_object_or_404asking for single object matchingpk.pkmeans primary key and each of objects will have one.
In our casepkmatches automatically genereatedidfield in our model. The value ofpkis passed toget()via URL defined inurls.pywhich we'll look at shortly. -
Finally
render()renders provided template and uses it to create a well-formed web response. We provide it name of the template to render, which we're going to build next.
Template for single object view
Most of our views will rely on templates stored in templates directory. Django templates use language[4] similar to Jinja2 so if you know Jinja you should be able to pick it up pretty quickly.
Best practice is to place templates used by our plugin in templates subdirectory named after our plugin. In our case that will be:
templates\bgppeering\
We refer to these templates later in few places. This makes it clear that template came from plugin namespace.
With that said, let's have a look at body of our template.
bgppeering.html
{% extends 'base.html' %}
{% load helpers %}

{% block content %}
<div class="row">
    <div class="col-md-6 col-md-offset-3">
        <div class="panel panel-default">
            <div class="panel-heading">
                <strong>BGP Peering</strong>
            </div>
            <table class="table table-hover panel-body attr-table">
                <tr>
                    <td>Site</td>
                    <td>
                        {% if bgppeering.site %}
                            <a href="{% url 'dcim:site' slug=bgppeering.site.slug %}">{{ bgppeering.site }}</a>
                        {% else %}
                            <span class="text-muted">None</span>
                        {% endif %}
                    </td>
                </tr>
                <tr>
                    <td>Device</td>
                    <td>
                        <a href="{% url 'dcim:device' pk=bgppeering.device.pk %}">{{ bgppeering.device }}</a>
                    </td>
                </tr>
                <tr>
                    <td>Local BGP AS</td>
                    <td>{{ bgppeering.local_as }}</td>
                </tr>
                <tr>
                    <td>Local peering IP address</td>
                    <td>
                        <a href="{% url 'ipam:ipaddress' pk=bgppeering.local_ip.pk %}">{{ bgppeering.local_ip }}</a>
                    </td>
                </tr>
                <tr>
                    <td>Remote BGP AS</td>
                    <td>{{ bgppeering.remote_as }}</td>
                </tr>
                <tr>
                    <td>Remote peering IP address</td>
                    <td>{{ bgppeering.remote_ip }}</td>
                </tr>
                <tr>
                    <td>Peer name</td>
                    <td>{{ bgppeering.peer_name|placeholder }}</td>
                </tr>
                <tr>
                    <td>Description</td>
                    <td>{{ bgppeering.description|placeholder }}</td>
                </tr>
            </table>
        </div>
    </div>
</div>
{% endblock %}
This looks like a lot but most of it is code generating table cells displaying attributes of object.
There are some interesting bits here though, let's look at them now:
-
{% extends 'base.html' %}-base.htmlcomes from NetBox and takes care of NetBox's look and feel for our page. It'll give us menus, footer, etc., we just need to take care of the main content. -
{% load helpers %}- loads custom tags and filters defined inhelpers. Again, we borrowhelpersfrom core NetBox. We need this because ofplaceholderfilter used in our template. -
Below links pointing to NetBox objects use Django's
urlfilter[5]. With that filter we don't have to hardcode links, instead we reference paths inurls.py.<a href="{% url 'dcim:site' slug=bgppeering.site.slug %}">{{ bgppeering.site }}</a> <a href="{% url 'dcim:device' pk=bgppeering.device.pk %}">{{ bgppeering.device }}</a <a href="{% url 'ipam:ipaddress' pk=bgppeering.local_ip.pk %}">{{ bgppeering.local_ip }}</a>For instance:
<a href="{% url 'dcim:site' slug=bgppeering.site.slug %}">{{ bgppeering.site }}</a>Points to below path in
netbox/netbox/dcim/views.py:path('sites/<slug:slug>/', views.SiteView.as_view(), name='site')Because URL is in
dcimapp and hasnameequal tositewe feeddcim:sitetourlfilter. This path also expectsslugargument.BgpPeeringobject keeps site info insiteattribute, so the siteslugcan be retrieved withbgppeering.site.slug.If you want to link to any other NetBox objects you can look at the paths recorded in
urls.pyfor given app. Then you need to identify expected argument. With those two you can construct links usingurlfilter, just like we did above. -
Lastly we display attribute values for given
BgpPeeringinstance by using dot.notation.
In view we created earlier, template receives variable namedbgppeeringcontainingBgpPeeringobject retrieved from database. Inside of our template we use that name to retrieve each of the model attributes by placing.afterbgppeering, followed by name of the attribute. E.g.bgppeering.site bgppeering.remote_ip
URL for single object view
We have single object view and template in place. Now we need to add URL path for it so the view can be accessed.
# urls.py
from .views import BgpPeeringView

urlpatterns = [
    ...
    path("<int:pk>/", BgpPeeringView.as_view(), name="bgppeering"),
]
First we import our view BgpPeeringView. Then we add another path entry to urlpatterns.
-
<int:pk>/equals toplugins/bgp-peering/<pk>, wherepkis the primary key of our record, and it's an integer, henceint. Our object use auto-incremented integeridfield as primary-key. Below is example of URL for object withidequal to 1.plugins/bgp-peering/1/ -
BgpPeering.as_view()-as_view()is needed here so that our view class can process requests. Technically speaking this creates callable that takes request and returns well- formed response. This is how we're going to use all our class based views.
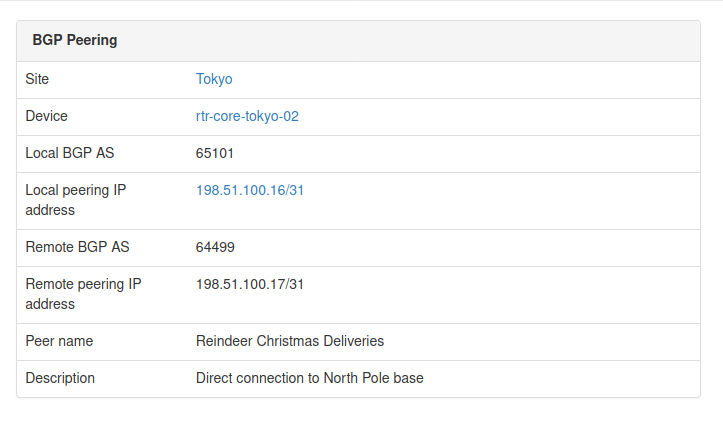
The end result of rendering this template is basic but clean looking table presenting details of BgpPeering object:
There are some improvements that we could make to this view but we'll leave that for later.
Source code up to this point is in branch bgppeering-view-init if you want to check it out: https://github.com/progala/ttl255-netbox-plugin-bgppeering/tree/bgppeering-view-init .
Object list view - BgpPeeringListView
List view is usually the default view for objects in NetBox. This provides overview of records for object of given type and includes links to detailed views.
We're now going to create list view for records using BgpPeering model. This view will be the one we link to from navigational menu we created in post 1.
Create table class
To create list page we'll start with building table class.
What's a table class you ask? NetBox uses Django app called django_tables2 [6] to make working with tables easier. We'll save ourselves some work by following NetBox's example and leveraging that package.
To do that we need to create file called tables.py in our plugin package and add code defining our table.
# tables.py
import django_tables2 as tables
from utilities.tables import BaseTable
from .models import BgpPeering


class BgpPeeringTable(BaseTable):
    """Table for displaying BGP Peering objects."""

    id = tables.LinkColumn()
    site = tables.LinkColumn()
    device = tables.LinkColumn()
    local_ip = tables.LinkColumn()

    class Meta(BaseTable.Meta):
        model = BgpPeering
        fields = (
            "id",
            "site",
            "device",
            "local_ip",
            "peer_name",
            "remote_ip",
            "remote_as",
        )
Let's break this code down.
-
Our table is a class, named
BgpPeeringTable. We subclassBaseTablefrom NetBox utilities which adds some NetBox specific stuff. -
In class
Metawe define model used in the table, followed by names of the fields we want displayed in the table. This class needs to subclassBaseTable.Meta. Few things of note:- You don't have to list all of the fields used by your model. You should select whatever you feel makes sense to show as one line summary for each object.
- Order in which fields are displayed on the page matches order in which you listed them.
-
Finally we define class attributes for fields that need special treatment. We list several fields here:
id,site,deviceandlocal_ipusetables.LinkColumn()object. This will give us auto-generated links pointing to corresponding NetBox objects.
With that in place we're moving to the template.
Template for object list view
Compared to template for single view, this one is much shorter because we're offloading a lot of work. Let's have a look at the body of the template and then we'll break it down.
bgppeering_list.html
{% extends 'base.html' %}
{% load render_table from django_tables2 %}

{% block content %}
<h1>{% block title %}BGP Peerings{% endblock %}</h1>
<div class="row">
    <div class="col-md-9">
        {% render_table table %}
    </div>
</div>
{% endblock %}
We are again extending from base.html. Then we have content block which contains suspiciously little amount of code.
There is title block, in which we override block in base.html with the same name. Then we just have render_table table statement inside of div.
That render_table[7] statement is where a lot of heavy lifting happens. It's template tag that comes from django_tables2 and it renders HTML table for us among other things. All we have to do is provide this template our previously defined table class in variable called table.
Object list view class
Finally we have view class. Our class will this time inherit from ObjectListView class coming from NetBox. That class provides a lot of goodness for building views for series of objects, and it will use table class we built earlier.
We're updating our views.py with the following additions.
# views.py
from django_tables2 import RequestConfig
...
class BgpPeeringListView(View):
    """View for listing all existing BGP Peerings."""

    queryset = BgpPeering.objects.all()

    def get(self, request):
        """Get request."""
        table = BgpPeeringTable(self.queryset)
        RequestConfig(request, paginate={"per_page": 25}).configure(table)

        return render(
            request, "netbox_bgppeering/bgppeering_list.html", {"table": table}
        )
We named this view class BgpPeeringListView. Inside the class we have queryset where we specify that we want all of the objects to be given to the view.
Then we have our table class in table var and RequestConfig object. We use request to configure pagination of 25 object per page with:
RequestConfig(request, paginate={"per_page": 25}).configure(table)
Finally we call render to return well formed web response. We give it request object, name of the template, and table object used in our template.
We're almost done here, but there's one more thing we need to do before we try this view out.
Adding get_absolute_url to model
For list view to work we have to implement method get_absolute_url[8] in BgpPeering model. This is required by list view to automatically create links to details of BgpPeering objects.
If you remember, in the table class we made id a LinkedColumn with id = tables.LinkColumn(). Now we need to add some code to BgpPeering model for this to actually work.
Add below to models.py.
# models.py
from django.urls import reverse

  class BgpPeering(ChangeLoggedModel):
  ...
    def get_absolute_url(self):
        """Provide absolute URL to a Bgp Peering object."""
        return reverse("plugins:netbox_bgppeering:bgppeering", kwargs={"pk": self.pk})
We defined get_absolute_url method that has single line of code.
In that line reverse function will generate correct URL for given BgpPeering record based on the provided pk. We use the name defined in urls to point to correct path mapped to single object view.
And that's it, we're ready to try out our list view.
If you now click on BGP Peerings in Plugins menu, you should get list view.
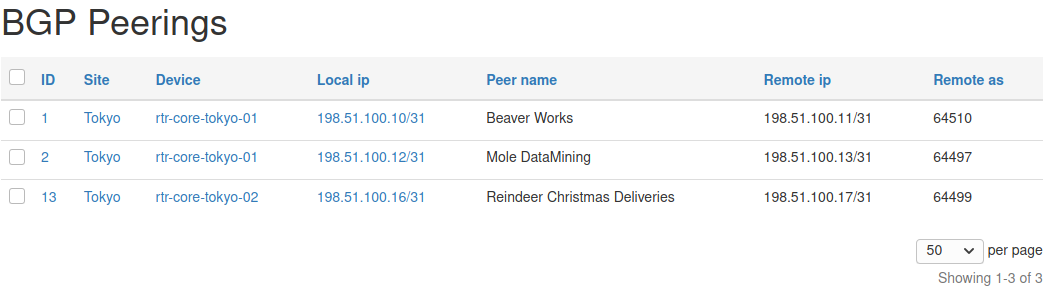
Notice auto-generated URLs to linked objects. We also get pagination for free!
Source code up to this point is in branch bgppeering-list-view-init if you want to check it out: https://github.com/progala/ttl255-netbox-plugin-bgppeering/tree/bgppeering-list-view-init .
Object creation view - BgpPeeringCreateView
We could already create objects from admin panel but that is not available to regular users.
Time to rectify this oversight and create view for adding BgpPeering objects.
Form for object creation view
For creation view to work we need to build class representing creation form. This is the form that end user will have to fill out when adding new object.
Forms go into forms.py file in the plugin's directory.
This is what I've added to that file.
# forms.py
from django import forms

from utilities.forms import BootstrapMixin

from .models import BgpPeering


class BgpPeeringForm(BootstrapMixin, forms.ModelForm):
    """Form for creating a new BgpPeering object."""

    class Meta:
        model = BgpPeering
        fields = [
            "site",
            "device",
            "local_as",
            "local_ip",
            "peer_name",
            "remote_as",
            "remote_ip",
            "description",
        ]
-
We create class
BgpPeeringFormsubclassingBootstrapMixinandforms.ModelForm. -
forms.ModelForm[9] is a Django helper class that allows building forms from models.BootstrapMixincomes from NetBox and adds Bootstrap CSS classes. This makes our form match the look and feel of other forms used in NetBox. -
In form class itself we define
Metaclass where we:- specify model used to generate the form with
model = BgpPeering - list fields that will show up on the form in list assigned to
fieldsvariable.
- specify model used to generate the form with
And that's it, we're ready to create the view class.
Object creation view class
With form in place we can now build a view.
Let's add the below code to views.py:
# views.py
...
from django.views.generic.edit import CreateView
...
from .forms import BgpPeeringForm

...

class BgpPeeringCreateView(CreateView):
    """View for creating a new BgpPeering instance."""

    form_class = BgpPeeringForm
    template_name = "netbox_bgppeering/bgppeering_edit.html"
We again create a class representing our view. But here we inherit from CreateView provided by Django. This helps us offload boilerplate related to validation and saving.
Form class we created in forms.py gets assigned to form_class variable. This will be used in the template.
To top it off we specify template we want to use for this form.
template_name = "netbox_bgppeering/bgppeering_edit.html"
Great, but we don't have that template yet you say. Indeed, time to create it.
Template for object creation view
We create new template and save it as bgppeering_edit.html.
{% extends 'base.html' %}

{% block content %}
<form action="" method="post" enctype="multipart/form-data" class="form form-horizontal">
    {% csrf_token %}
    <div class="row">
        <div class="col-md-6 col-md-offset-3">
            <h3>
                {% block title %}Add a new BGP Peering{% endblock %}
            </h3>
            <div class="panel panel-default">
                <div class="panel-heading"><strong>BGP Peering</strong></div>
                <div class="panel-body">
                    {% for field in form %}
                    <div class="form-group">
                        <label class="col-md-3 control-label {% if field.field.required %} required{% endif %}" for="{ field.id_for_label }}">
                            {{ field.label }}
                        </label>
                        <div class="col-md-9">
                            {{ field }}
                            {% if field.help_text %}
                            <span class="help-block">{{ field.help_text|safe }}</span>
                            {% endif %}
                        </div>
                    </div>
                    {% endfor %}
                </div>
            </div>
        </div>
    </div>
    <div class="row">
        <div class="col-md-6 col-md-offset-3 text-right">
            {% block buttons %}
            <button type="submit" name="_create" class="btn btn-primary">Create</button>
            {% endblock %}
        </div>
    </div>
</form>
{% endblock %}
Looks like there's a lot going on but it's not that scary actually.
First we define HTML form. Inside of the form we add div elements making this form centered on the page.
Then we loop over fields of the form with {% for field in form %}. For each field we display label, in bold if field is required. Then we show the field itself.
Django will match render of each field to its type, as defined in the model. Finally we display helper text if one exists.
Validation and creation of the object will be handled by Django, courtesy of the class we're subclassing. After object is created we will be redirected to the single object view.
We're almost there, we only have two small additions left and create view will be ready for action.
Navigation button for object creation
So we've got our form and logic behind it but we need to access it somehow. For that we will add green plus button next to BGP Peerings entry in navigation bar. This will match behavior of the other NetBox menu items.
Below is the navigation.py after additions.
# navigation.py
from extras.plugins import PluginMenuButton, PluginMenuItem
from utilities.choices import ButtonColorChoices


menu_items = (
    PluginMenuItem(
        link="plugins:netbox_bgppeering:bgppeering_list",
        link_text="BGP Peerings",
        buttons=(
            PluginMenuButton(
                link="plugins:netbox_bgppeering:bgppeering_add",
                title="Add",
                icon_class="fa fa-plus",
                color=ButtonColorChoices.GREEN,
            ),
        ),
    ),
)
We are passing extra items to buttons argument of PluginMenuItem.
Class needed for creating button is called PluginMenuButton and we initialize it with few arguments:
link- this needs to match name of the path for our create view. We're going to add this path inurls.pyshortly.title- Text that appears when you hover over the button.icon_class- specifies font-awesome icon to usefa fa-plusis a plus sign.color- color of our buttonButtonColorChoices.GREENis green.
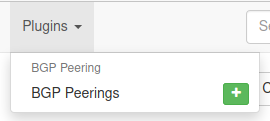
The end result should look like this:
URL for object creation view
Finally, we need URL leading to object creation form. Let's modify urls.py.
# urls.py
from .views import BgpPeeringCreateView, BgpPeeringView, BgpPeeringListView


urlpatterns = [
    ...
    path("add/", BgpPeeringCreateView.as_view(), name="bgppeering_add"),
]
We import BgpPeeringCreateView and register it under add/ path using name bgppeering_add.
And that's it. With all the components in place we're ready to take our form for a spin!
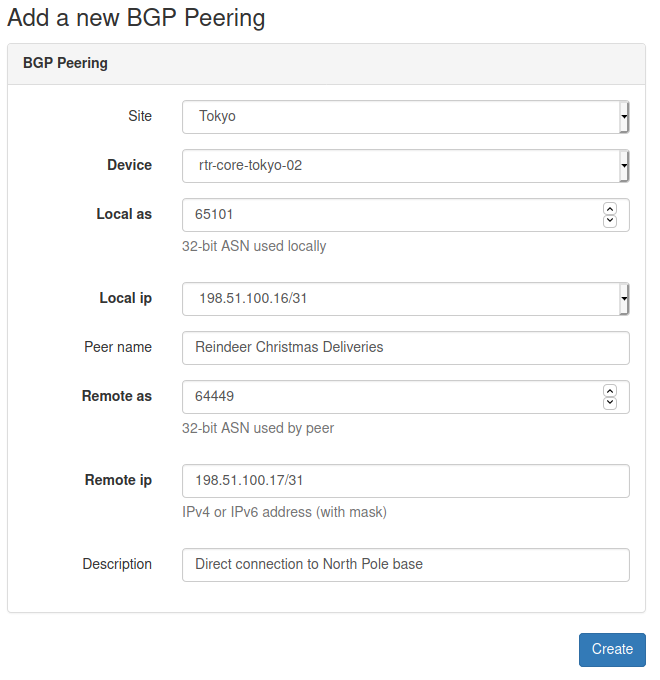
And here it is, form for adding BGP Peering object in its full glory!
Source code up to this point is in branch bgppeering-create-view-init if you want to check it out: https://github.com/progala/ttl255-netbox-plugin-bgppeering/tree/bgppeering-create-view-init .
Conclusion
This concludes post 2 in Developing NetBox Plugin series. Web UI pages we built here give our users ways of interacting with model we built in part 1. They can now list, view details of, and create new Bgp Peering instances.
We could really stop here but there's more we can add to our pages. We can integrate change log into views. Or why not make our views like other NetBox pages by adding search panel and add/edit/delete buttons. How about permissions? It'd be good to revisit those and make our plugin use them.
We will be looking at some of those improvements in the future posts. So do come back for more!
Resources
- NetBox docs: Plugin Development: https://netbox.readthedocs.io/en/stable/plugins/development/
- NetBox source code on GitHub: https://github.com/netbox-community/netbox
- NetBox Extensibility Overview, NetBox Day 2020: https://www.youtube.com/watch?v=FSoCzuWOAE0
- NetBox Plugins Development, NetBox Day 2020: https://www.youtube.com/watch?v=LUCUBPrTtJ4
Django views: https://docs.djangoproject.com/en/3.1/topics/http/views/ ↩︎
Django
Manager: https://docs.djangoproject.com/en/3.1/topics/db/managers/#django.db.models.Manager ↩︎Django class-based Views: https://docs.djangoproject.com/en/3.1/topics/class-based-views/ ↩︎
Django templating language: https://docs.djangoproject.com/en/3.1/ref/templates/language/ ↩︎
Django
urlfilter: https://docs.djangoproject.com/en/3.1/ref/templates/builtins/#url ↩︎django-tables2 docs: https://django-tables2.readthedocs.io/en/latest/ ↩︎
render-tablein django-tables2 docs: https://django-tables2.readthedocs.io/en/latest/pages/template-tags.html#render-table ↩︎get-absolute-urlin Django docs: https://docs.djangoproject.com/en/3.1/ref/models/instances/#get-absolute-url ↩︎Django - Creating forms from models: https://docs.djangoproject.com/en/3.1/topics/forms/modelforms/ ↩︎