
Welcome to part 4 of the tutorial on developing NetBox plugin. By now BgpPeering plugin is functional but there are few things here and there that could make it better. In this post, we'll go through many improvements that will make the plugin look better and increase its functionality.
Developing NetBox Plugin tutorial series
- Developing NetBox Plugin - Part 1 - Setup and initial build
- Developing NetBox Plugin - Part 2 - Adding web UI pages
- Developing NetBox Plugin - Part 3 - Adding search panel
- Developing NetBox Plugin - Part 4 - Small improvements
- Developing NetBox Plugin - Part 5 - Permissions and API
Contents
- Updating display name of BgpPeering objects
- Enforce the same network for local and remote IPs
- Allowing objects to be deleted
- Allowing objects to be edited
- Prettifying field labels
- Conclusion
- Resources
- BGP Peering Plugin GitHub repository
Updating display name of BgpPeering objects
We'll start improvements by changing default display name of BgpPeering objects.
Currently, when we create new objects we get a name that is not very descriptive:

Instead of BgpPeering object (28) we'd like to have something more meaningful.
We could perhaps show here device name, peer name, or even remote BGP AS number.
Unfortunately, we decided to make peer name optional so this might not be a good candidate for the display name of an object. It's possible to include it conditionally. But that would result in inconsistent naming for objects that don't have peer name defined. For the sake of consistency, I will only include the device name and the remote BGP AS number.
Essentially, I want our display name to look like so:
rtr-core-tokyo-02:3131
To do that we need to override __str__ method in BgpPeering model class contained in models.py.
# models.py
class BgpPeering(ChangeLoggedModel):
...
    def __str__(self):
        return f"{self.peer_name}:{self.remote_as}"
If we now create a new object we'll see the below in changelog:

Much better, now the BGP Peering object names mean something. We can see the local device the peering is on and the AS number of remote peer.
Enforce the same network for local and remote IPs
Local IP address is selected from the list of IP addresses available in NetBox when creating new BGP Peering. But when we add remote IP address we have to type it in manually. If you try entering remote IP that is in a network different than the one local IP is in our form will happily accept it.
It perhaps is not that much of an issue but I thought this is a good place to show you how we can add custom validation to forms.
Add validation to form class
We'll update class BgpPeeringForm in forms.py with code that performs the required validation.
To validate multiple form fields we can use method clean()[1] which comes from Django Form class.
Let's implement our check:
# forms.py

import ipaddress

class BgpPeeringForm(BootstrapMixin, forms.ModelForm):
...
    def clean(self):
        cleaned_data = super().clean()
        local_ip = cleaned_data.get("local_ip")
        remote_ip = cleaned_data.get("remote_ip")

        if local_ip and remote_ip:
            # We can trust these are valid IP addresses. Address format validation done in .super()
            if (
                ipaddress.ip_interface(str(local_ip)).network
                != ipaddress.ip_interface(str(remote_ip)).network
            ):
                msg = "Local IP and Remote IP must be in the same network."
                self.add_error("local_ip", msg)
                self.add_error("remote_ip", msg)
First, we import ipaddress library which we'll use to check if IPs belong to the same network.
Next, we go inside of clean() method.
To trigger field validation of individual fields and retrieve the results we call clean() method from the parent class.
cleaned_data = super().clean()
Now that we have validated field values in cleaned_data we can retrieve strings coming from local IP and remote IP form fields.
local_ip = cleaned_data.get("local_ip")
remote_ip = cleaned_data.get("remote_ip")
With values retrieved we write conditional to check if any of them are empty. This should never happen but we might want more processing here in the future so it's prudent to do so.
if local_ip and remote_ip:
Next, we have conditional implementing network checking logic. We use ip_interface [2] function from ipaddress module to create IPv4Interface or IPv4Interface objects from each of our IP addresses.
The interface objects have a handy network attribute that returns IP network the interface belongs to. This allows us to directly compare networks for peering IPs.
If networks are the same we take no action, i.e. form returns with no errors. However, if the networks differ we generate an error message and assign it to msg variable. We then append this error to validation results for local_ip and remote_ip form fields.
if (
    ipaddress.ip_interface(str(local_ip)).network
    != ipaddress.ip_interface(str(remote_ip)).network
):
    msg = "Local IP and Remote IP must be in the same network."
    self.add_error("local_ip", msg)
    self.add_error("remote_ip", msg)
Show errors on the form in web UI
We now have code handling validation and generating errors. We now have code handling validation and generating errors. The next step is to update the form template so that the errors show up in the web UI.
I added {% if field.errors %} block to div rendering fields in bgppeering_edit.html:
<div class="col-md-9">
    {{ field }}
    {% if field.help_text %}
    <span class="help-block">{{ field.help_text|safe }}</span>
    {% endif %}
    {% if field.errors %}
    <ul>
        {% for error in field.errors %}
        <li class="text-danger">{{ error }}</li>
        {% endfor %}
    </ul>
    {% endif %}
</div>
When form fails validation, errors for each form field will be returned in field.errors attribute [^field_erros]. We can then loop over errors and display them under a given field.
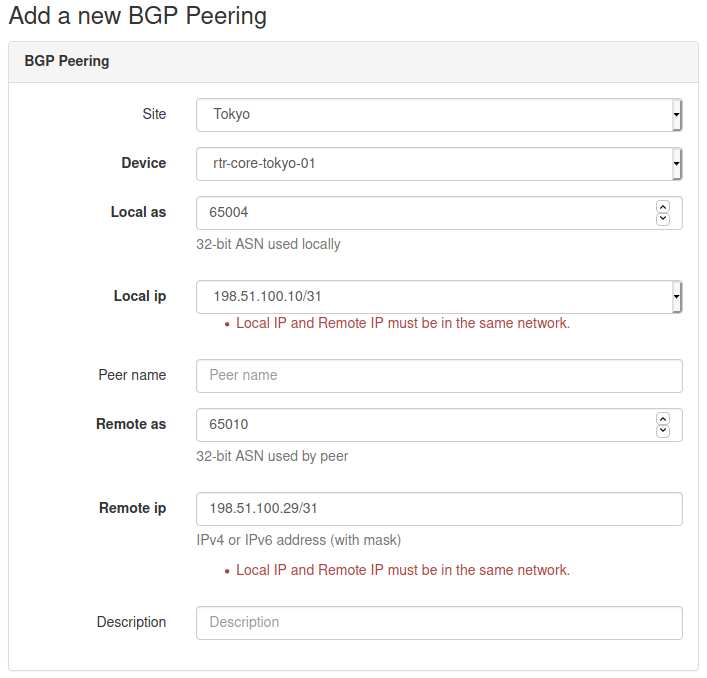
Below is an example where I entered IP addresses belonging to different networks. You can see that the form failed validation and errors are displayed under each of the fields.
Allowing objects to be deleted
We have been happily adding BGP Peerings objects but at some point, we might have to delete some of them. Unfortunately, the only way to do it right now is from the admin panel. This is less than ideal and thus we decide to implement delete functionality.
Creating delete view
There are few places we need to modify, let's start with views.py.
from django.urls import reverse_lazy
...
from django.views.generic.edit import CreateView, DeleteView

...

class BgpPeeringDeleteView(DeleteView):
    """View for deleting a BgpPeering instance"""

    model = BgpPeering
    success_url = reverse_lazy("plugins:netbox_bgppeering:bgppeering_list")
    template_name = "netbox_bgppeering/bgppeering_delete.html"
We import reverse_lazy function which will be used to return the page for the given namespace URL.
We also borrow another of Django's generic edit views, DeleteView[3], which will offload a lot of required work. This class class will handle both GET and POST methods.
- If
GETis used view will return the confirmation page. That page should contain a form that willPOSTto the URL pointing to this view. - If
POSTis used then the provided object will be deleted.
For our plugin, we will go down the route of GET followed by POST from the confirmation page form.
The actual view is relatively short:
- We define
BgpPeeringDeleteViewclass inheriting fromDeleteView. modelvariable takes model class for this view, hereBgpPeering.success_urldefines URL to which view will redirect after an object has been deleted. Here I provide a namespaced URL pointing to list view of our records.template_namepoints to the template that will be rendered when we're asked to confirm the deletion.
Next, we look at the deletion confirmation template.
Delete confirmation template
Deleting objects is a serious business so I thought that we should customize the deletion confirmation page. It will also make it look like other prompts in NetBox.
Here is our template:
# bgppeering_delete.html
{% extends 'base.html' %}
{% load form_helpers %}

{% block content %}
<div class="row">
	<div class="col-md-6 col-md-offset-3">
        <form action="" method="post" class="form">
            {% csrf_token %}
            <div class="panel panel-{{ panel_class|default:"danger" }}">
                <div class="panel-heading">Delete BGP Peering?</div>
                <div class="panel-body">
                    <p>Are you sure you want to delete BGP Peering <strong>{{ object }}</strong>?</p>
                    <div class="text-right">
                        <button type="submit" name="_confirm" class="btn btn-{{ button_class|default:"danger" }}">Confirm</button>
                        <a href="{% url 'plugins:netbox_bgppeering:bgppeering' pk=bgppeering.pk %}" class="btn btn-default">Cancel</a>
                    </div>
                </div>
            </div>
        </form>
	</div>
</div>
{% endblock %}
This is a pretty standard form. We have some styling to make users aware of the seriousness of the operation.
Of interest are two buttons, Confirm and Cancel.
Confirmwill submit the form to the URL pointing to our delete view. This will result in thePOSTaction triggering deletion of the object.Cancelwill take us back to the detailed view of the object instead of deleting it.
Add url to delete view
We created a delete view but there's no way to reach it currently. We need to add URL pointing to it.
Let's add the missing URL:
# urls.py
from .views import (
    BgpPeeringCreateView,
    BgpPeeringDeleteView,
    BgpPeeringListView,
    BgpPeeringView,
)


urlpatterns = [
...
    path("<int:pk>/delete/", BgpPeeringDeleteView.as_view(), name="bgppeering_delete"),
]
We added BgpPeeringDeleteView class to the import list. Then we created new entry in urlpatterns:
path("<int:pk>/delete/", BgpPeeringDeleteView.as_view(), name="bgppeering_delete")
This is like URL for a detailed view. We use pk attribute again, which is whatBgpPeeringDeleteView will need to locate the object for deletion. We name this URL bgppeering_delete to make referring to it easier.
Adding object view header and delete button
The last thing we're missing is some kind of button in UI that would allow us to delete objects. This is what we're going to do next.
I'm going to edit the detailed object view template and add a few things:
- Breadcrumb with link to the list of objects followed by name of the current object.
- Date showing when this object was created.
- Time elapsed since this object was last updated.
- Delete object button leading to delete confirmation page.
# bgppeering.html
{% block header %}
<div class="row noprint">
<div class="col-sm-8">
<ol class="breadcrumb">
<li><a href="{% url 'plugins:netbox_bgppeering:bgppeering_list' %}">BGP Peerings</a></li>
<li>{{ bgppeering }}</li>
</ol>
</div>
</div>
<div class="col-sm-8">
<a href="{% url 'plugins:netbox_bgppeering:bgppeering_delete' pk=bgppeering.pk %}" class="btn btn-danger pull-right">
<span class="{{ icon_classes.trash }}" aria-hidden="true"></span> Delete
</a>
</div>
<div class="col-sm-8">
<h1>{% block title %}{{ bgppeering }}{% endblock %}</h1>
<p>
<small class="text-muted">Created {{ bgppeering.created }} · Updated <span
title="{{ bgppeering.last_updated }}">{{ bgppeering.last_updated|timesince }}</span> ago</small>
</p>
</div>
{% endblock %}
As you can see I'm overriding block header which comes from base.html. This block is used for elements displayed below the main menu but above the rest of the content.
Then we have 3 divs:
- Div with breadcrumb where we have URL for the page with list objects, followed by the name of the current object.
- Div with button pointing to URL responsible for deleting the object. We pass this URL the
pkvalue identifying the current object. - Div containing the name of the object, as a title. This is followed by the object creation date and time since this object was last updated.
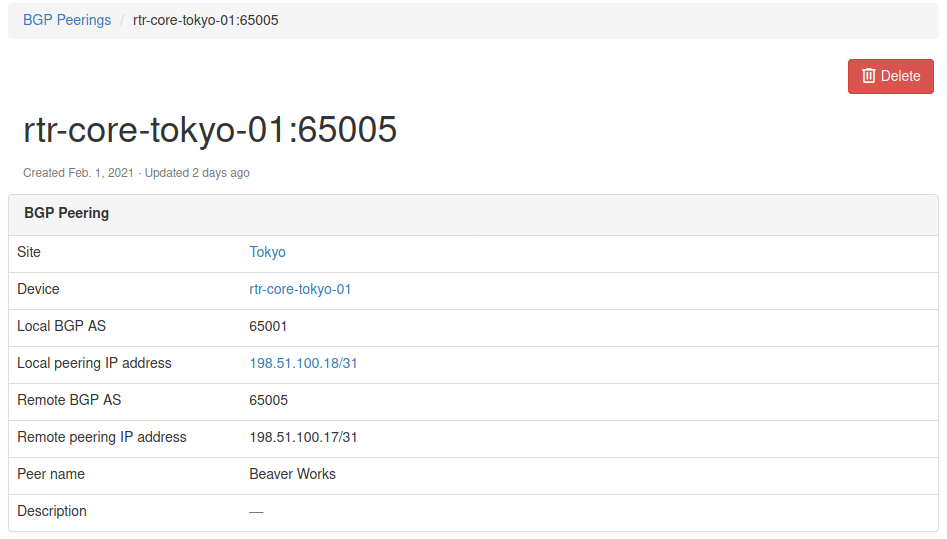
If you were to run the code we added up to this point you should see the object details page looking like the below one:
And when we click Delete button we should be presented with the confirmation prompt:

That's pretty cool, we can now add, and delete objects. This thing is starting to look better and better.
But we're not done here. Why not add edit functionality so that we can modify existing objects?
Allowing objects to be edited
You might be happy to know that to enable editing we can reuse most of the template code used for object creation. We will need to modify it and create an edit view but it takes less work than adding object deletion.
Creating edit view
To create the edit view class I added the below code to views.py:
# views.py
from django.views.generic.edit import CreateView, DeleteView, UpdateView
...
class BgpPeeringEditView(UpdateView):
    """View for editing a BgpPeering instance."""

    model = BgpPeering
    form_class = BgpPeeringForm
    template_name = "netbox_bgppeering/bgppeering_edit.html"
We complete our collection of generic views by importing UpdateView [4]. As usual, this will do a lot of hard work for us.
Then comes our class, BgpPeeringEditView. In this class we define:
model- Model class used for this class, hereBgpPeering.form_class- Form used by the view and template. We reuse the form we built for the object creation view,BgpPeeringForm.template_name- Template used by this view, again, we reuse existing templatebgppeering_edit.html.
That was nice, we reused existing components and plugged them into edit view.
Next, we need to modify the template so it can support both creating and editing objects.
Modify object creation template
As I mentioned, we can mostly reuse the existing template, bgppeering_edit.html, with some mall modifications.
# bgppeering_edit.html
...
    {% block title %}
    {% if object.pk %}
        Editing BGP Peering - {{ object }}
    {% else %}
        Add a new BGP Peering
    {% endif %}
    {% endblock %}
...
    <div class="row">
        <div class="col-md-6 col-md-offset-3 text-right">
            {% block buttons %}
            <button type="submit" name="_create" class="btn btn-primary">Create</button>
            {% endblock %}
            {% if object.pk %}
                <button type="submit" name="_update" class="btn btn-primary">Update</button>
                <a href="{% url 'plugins:netbox_bgppeering:bgppeering' pk=bgppeering.pk %}" class="btn btn-default">Cancel</a>
            {% else %}
                <button type="submit" name="_create" class="btn btn-primary">Create</button>
                <a href="{% url 'plugins:netbox_bgppeering:bgppeering_list' %}" class="btn btn-default">Cancel</a>
            {% endif %}
        </div>
The first thing we're doing here is checking if object.pk has value. Edit view will automatically pass pk to the template. So if pk has value then we're dealing with object edit and display appropriate title. Otherwise, we display the original title for adding a new object.
Next, we modify the section showing buttons below the form. Here we also add conditional, checking if object.pk has value.
- If conditional evaluates to
Trueit means we're dealing with object edit action. We present two buttons,Updatewill save changes made to the object.Cancelwill take us back to the object details view. - If conditional evaluates to
Falsewe follow the logic we built originally, an object is either created or we're sent to the list view.
And that's it, our template now supports both object creation and editing.
Adding editing button and URL
Most of the work is done here. We should now add URL pointing to the edit view and edit button that will allow users to edit the object.
# urls.py
from .views import (
    BgpPeeringCreateView,
    BgpPeeringDeleteView,
    BgpPeeringEditView,
    BgpPeeringListView,
    BgpPeeringView,
)

urlpatterns = [
...
    path("<int:pk>/edit/", BgpPeeringEditView.as_view(), name="bgppeering_edit"),
]
This URL is similar to the one for deleting an object. We again have pk argument which we pass to class view. We use a friendly name for URL, bgppeering_edit.
Finally we will add edit button next to the delete button on object details view page:
# bgppeering_edit.html
    <div class="pull-right noprint">
        <a href="{% url 'plugins:netbox_bgppeering:bgppeering_edit' pk=bgppeering.pk %}" class="btn btn-warning">
            <span class="{{ icon_classes.pencil }}" aria-hidden="true"></span> Edit
        </a>
        <a href="{% url 'plugins:netbox_bgppeering:bgppeering_delete' pk=bgppeering.pk %}" class="btn btn-danger">
            <span class="{{ icon_classes.trash }}" aria-hidden="true"></span> Delete
        </a>
    </div>
And that's it, we should now be able to edit given object. Let's give it a try.
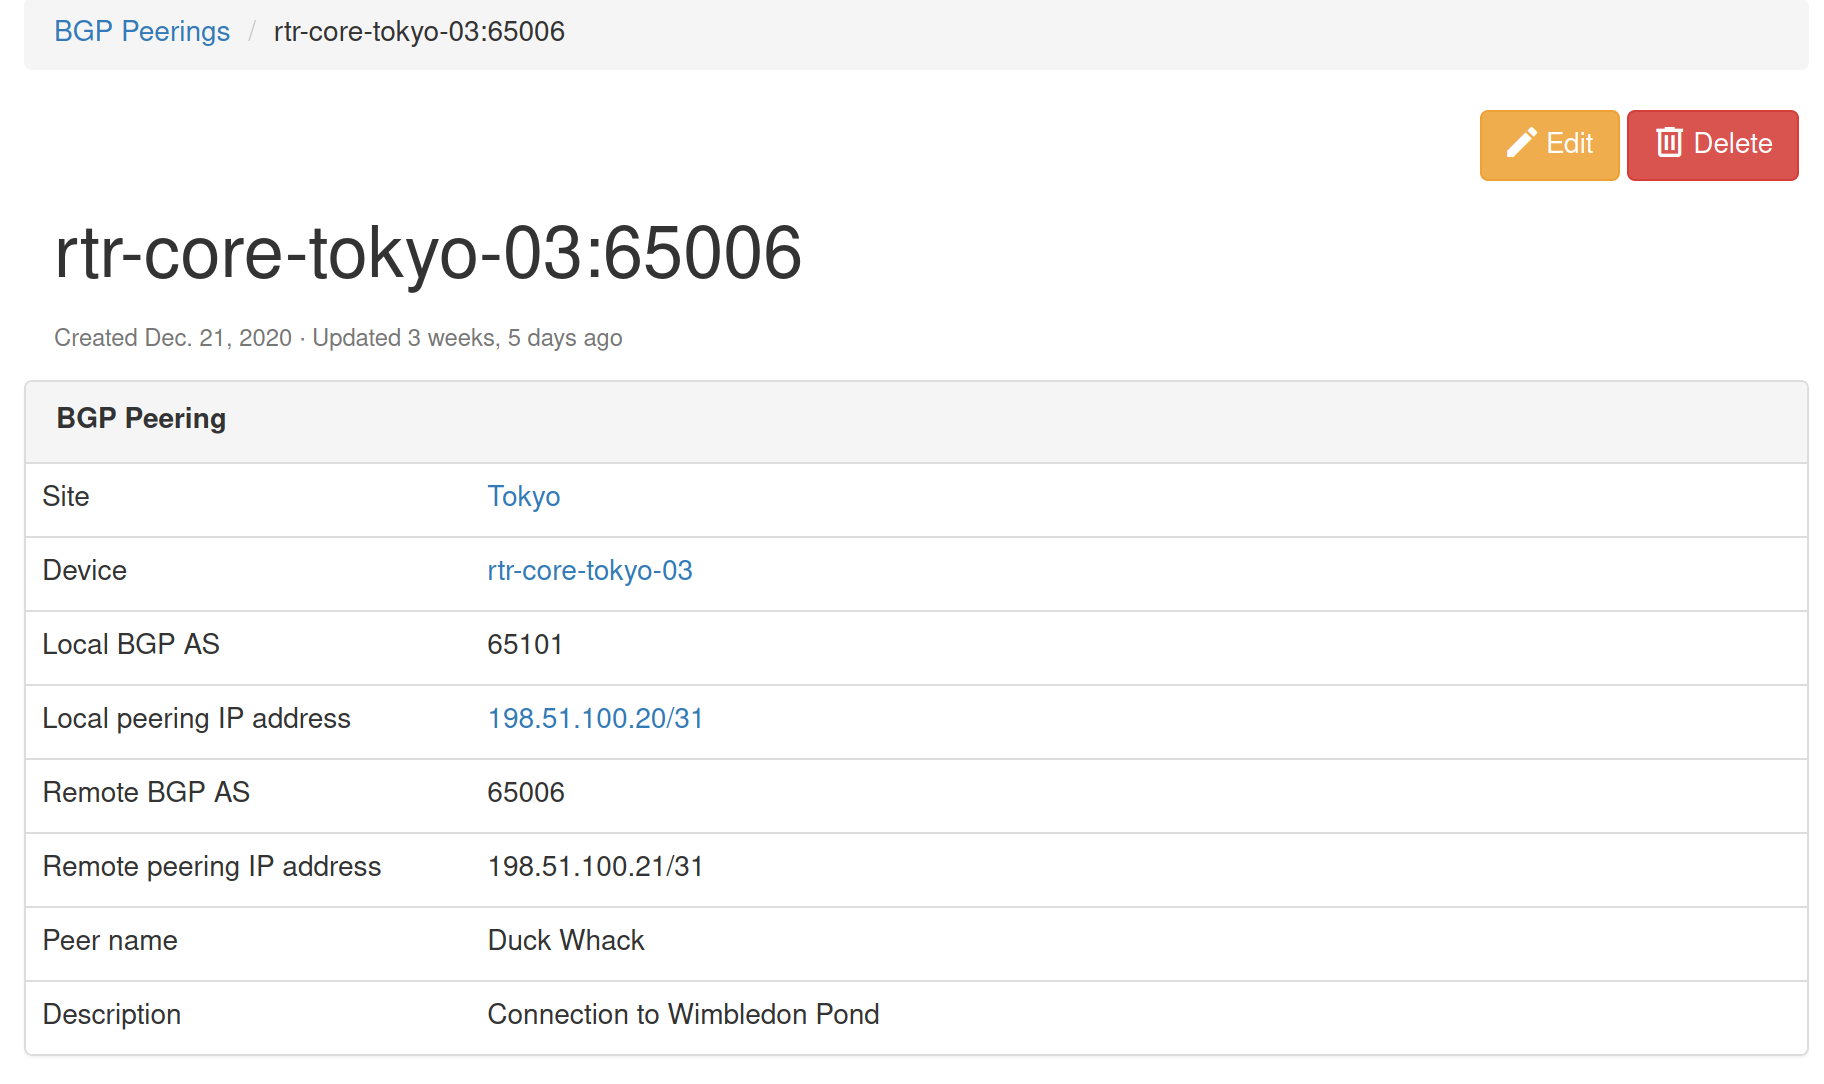
Here's the page with object details, notice Edit button.
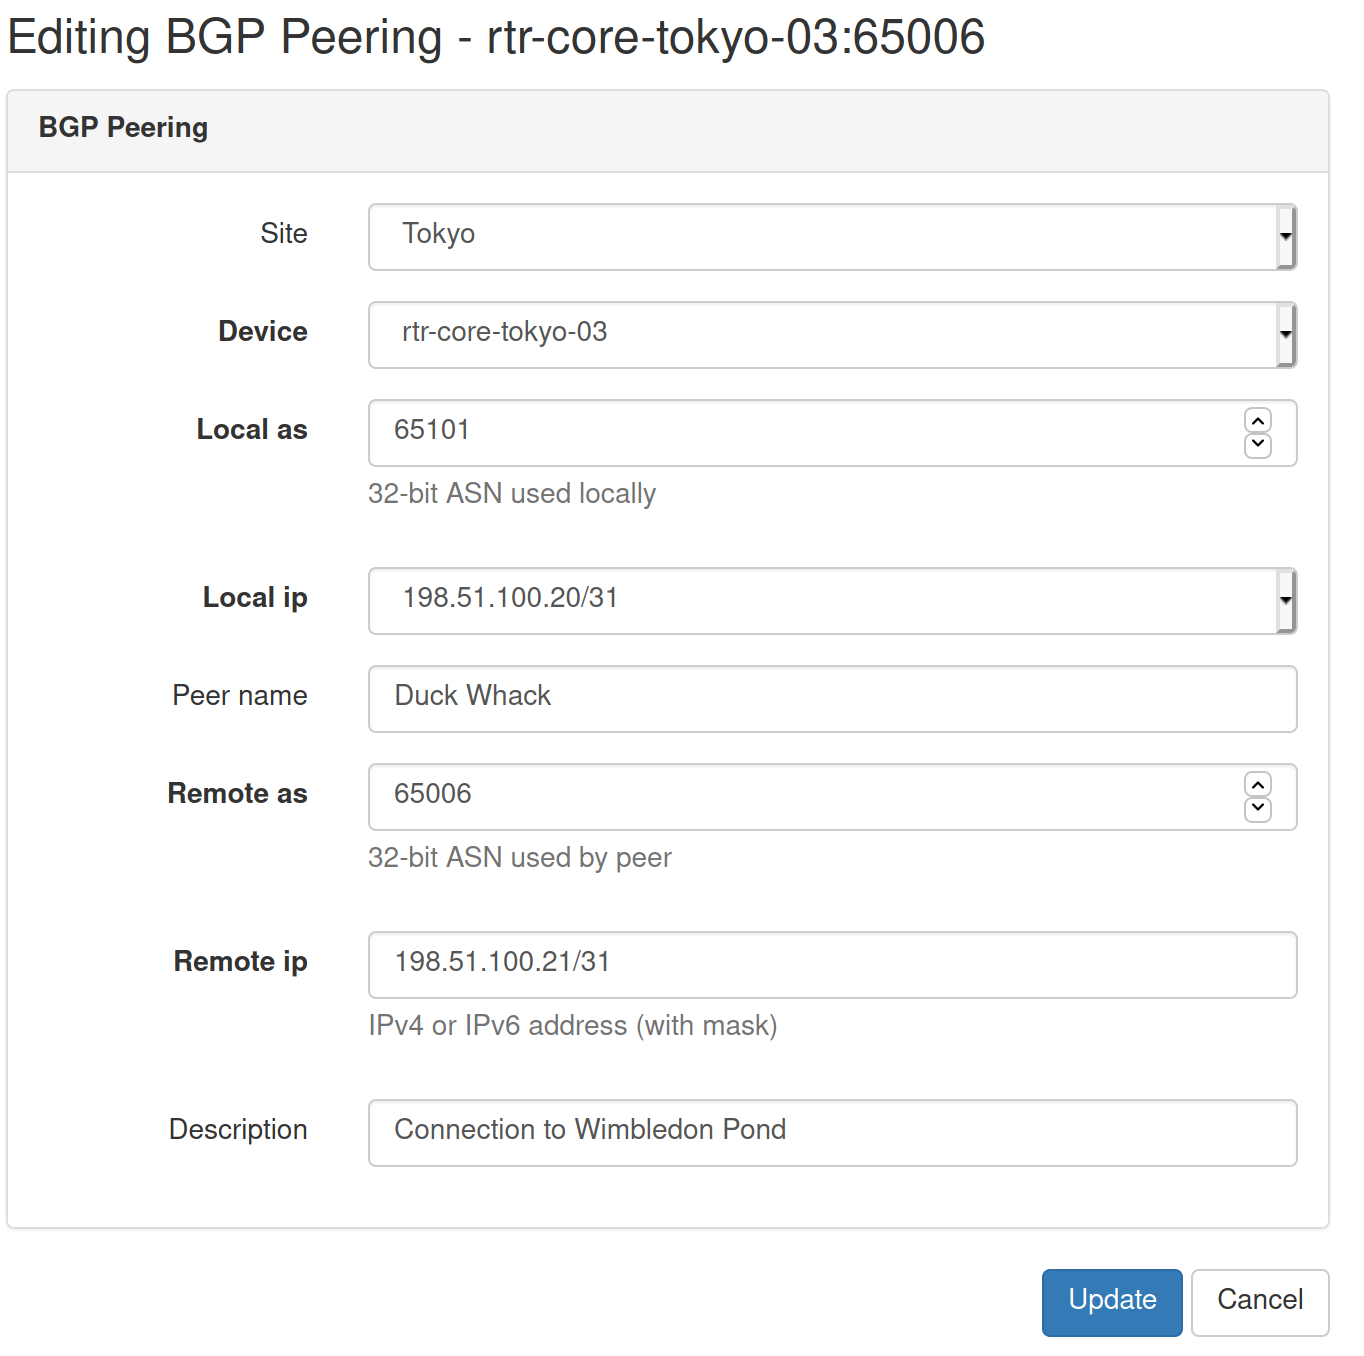
And here's the edit view that we'll get after the edit button is clicked.
Another useful addition to our plugin is complete.
Prettifying field labels
Current field labels displayed in the list view and few other places are derived from model fields. Not all of them look pretty so we should work on making them look better.

Let's override default field names in model class in models.py.
# models.py
class BgpPeering(ChangeLoggedModel):
...
    local_ip = models.ForeignKey(
        to="ipam.IPAddress", on_delete=models.PROTECT, verbose_name="Local IP"
    )
    local_as = ASNField(help_text="32-bit ASN used locally", verbose_name="Local ASN")
    remote_ip = IPAddressField(
        help_text="IPv4 or IPv6 address (with mask)", verbose_name="Remote IP"
    )
    remote_as = ASNField(help_text="32-bit ASN used by peer", verbose_name="Remote ASN")
    peer_name = models.CharField(max_length=64, blank=True, verbose_name="Peer Name")
To customize the text displayed for the given field we pass the argument verbose_name [5] when creating field objects. The value of each of the arguments will be the text we want to display as the field name.
We will also do the same for the search filter. In this case, we edit form class in forms.py.
# forms.py
class BgpPeeringFilterForm(BootstrapMixin, forms.ModelForm):
...
    local_as = forms.IntegerField(
        required=False,
        label="Local ASN",
    )

    remote_as = forms.IntegerField(
        required=False,
    )
    remote_as = forms.IntegerField(required=False, label="Remote ASN")

    peer_name = forms.CharField(
        required=False,
        label="Peer Name",
    )
We add label [6] argument to each form field we want to customize.
That's it, let's see how the fields are looking like now.

Perfect, names and labels are looking better now.
We'll finish our small improvements by adding Add button to the list view in bgppeering_list.html.
# bgppeering_list.html
...
{% block content %}
<div class="pull-right noprint">
    <a href="{% url 'plugins:netbox_bgppeering:bgppeering_add' %}" class="btn btn-primary">
        <span class="{{ icon_classes.plus }}" aria-hidden="true"></span> Add
    </a>
</div>
And with this last modification we've come to an end of this post.
Source code with all the modifications we made up to this point is in branch small-improvements if you want to check it out: https://github.com/progala/ttl255-netbox-plugin-bgppeering/tree/small-improvements
Conclusion
In the previous posts of this series, we were focusing on getting the plugin off the ground. We implemented models, and several views and forms. Here we had a closer look and added improvements that make the plugin easier to use. It might not seem like much but these kinds of small additions can make our lives much easier.
The next post will be the last in the series. We'll complete our plugin by adding user permissions as well as API calls. See you next time!
Resources
- NetBox docs: Plugin Development: https://netbox.readthedocs.io/en/stable/plugins/development/
- NetBox source code on GitHub: https://github.com/netbox-community/netbox
- NetBox Extensibility Overview, NetBox Day 2020: https://www.youtube.com/watch?v=FSoCzuWOAE0
- NetBox Plugins Development, NetBox Day 2020: https://www.youtube.com/watch?v=LUCUBPrTtJ4
https://docs.djangoproject.com/en/3.1/ref/forms/api/#django.forms.Form.clean ↩︎
https://docs.python.org/3/library/ipaddress.html#ipaddress.ip_interface ↩︎
https://docs.djangoproject.com/en/3.1/ref/class-based-views/generic-editing/#django.views.generic.edit.DeleteView ↩︎
https://docs.djangoproject.com/en/3.1/ref/class-based-views/generic-editing/#django.views.generic.edit.UpdateView ↩︎
https://docs.djangoproject.com/en/3.1/topics/db/models/#verbose-field-names ↩︎
https://docs.djangoproject.com/en/3.1/ref/forms/fields/#label ↩︎