
NetBox is an open source IPAM/DCIM solution that came out of DigitalOcean. It's an excellent piece of software that is being actively developed and has very lively community. New features are being constantly added and I find it to be better than any of the commercial solutions available out there. If you never heard of it I strongly recommend having a look at the Github and Docs pages:
- https://github.com/digitalocean/netbox - NetBox Github repo
- https://netbox.readthedocs.io/en/stable/ - NetBox docs
One of the great selling points of NetBox is well thought through and easy to use REST API. DigitalOcean folks also provide great Python API client, which will be the subject of this blog series.
Posts in the Pynetbox series:
- Pynetbox - NetBox Python API client part 1 - getting info
- Pynetbox - NetBox Python API client part 2 - creating objects
- Pynetbox - NetBox Python API client part 3 - updates and deletions
- Pynetbox - NetBox Python API client part 4 - tags and auto-assign prefixes
Contents
- Software versions in this blog post
- Setup and prerequisites
- Using pynetbox to retrieve data
- Using filter() and get()
- All object information in one place
- Examples of accessing other endpoints
- GitHub repository with resources for this post
- References
Software versions in this blog post
This blog post is based on the following versions of software:
- NetBox v2.4.8
- Pynetbox v3.4.7.
Examples are run with Python v3.7.0 but should work with any version of Python3.
Setup and prerequisites
I assume you already have NetBox installed and that machine running pynetbox has access to it. Before installing pynetbox you will also need to create API token, if you don't have one already.
To create token either navigate to Profile page when logged in as user that needs token, or generate one from the admin panel. Note that you need to have rights to create token from your profile page. If your administrator didn't give you permission to do that, you will have to ask her to create one for you from the admin panel.
Below I'm showing steps for creating API token using both of these methods.
Create API token via Profile page
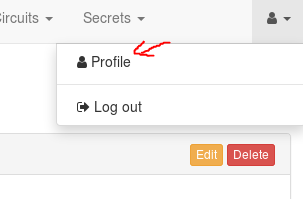
- Navigate to the user Profile page.
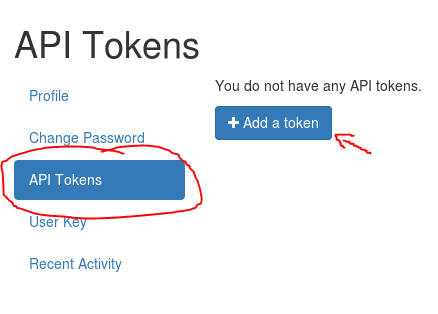
- Go to the "API Tokens" section on the Profile page and click "Add a token" button.
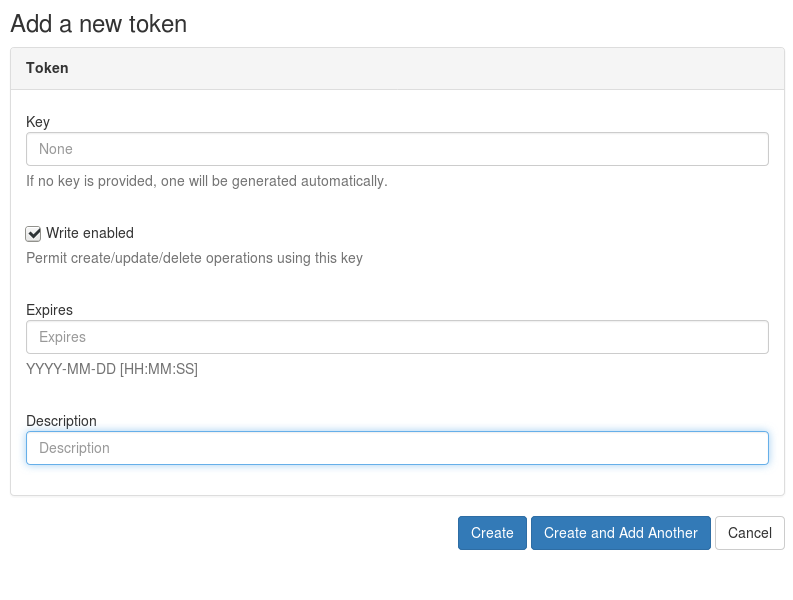
- You will be presented with a token creation form. Here you can enter the token key, or leave the field blank and one will be automatically created for you. You can also make the token write enabled, as well as add description and set the expiration date
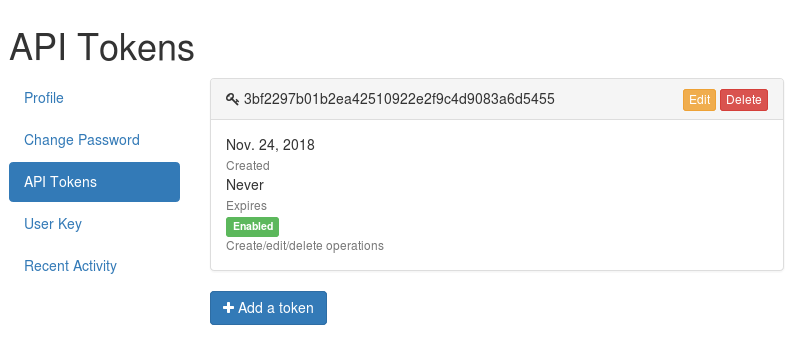
- After you created your token you should see the newly created key on your profile page.
As an administrator, create user API key in the admin panel.
- Navigate to the Users -> Tokens section in the admin panel and click on Add button.

-
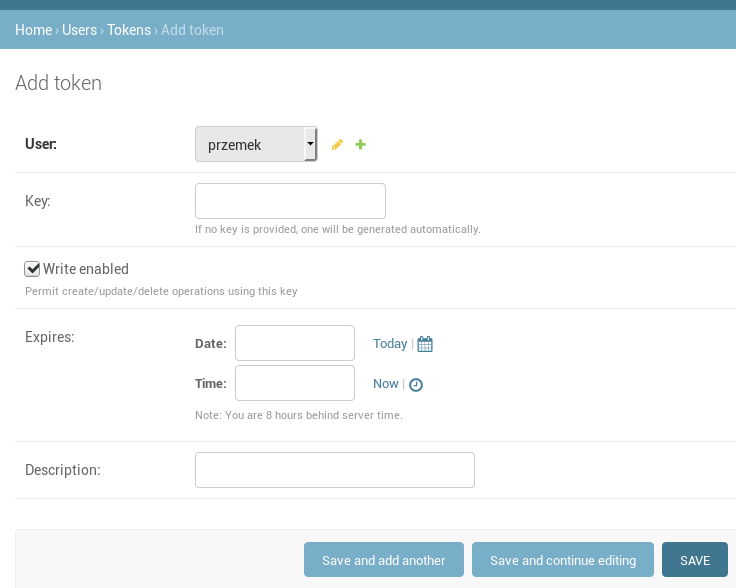
You will be presented with the token creation form. Select from the User drop down menu the user for whom you want to create a token.
-
Enter key manually, or leave the field blank to have key automatically created for you. Set write permissions, description and expiration date as appropriate.
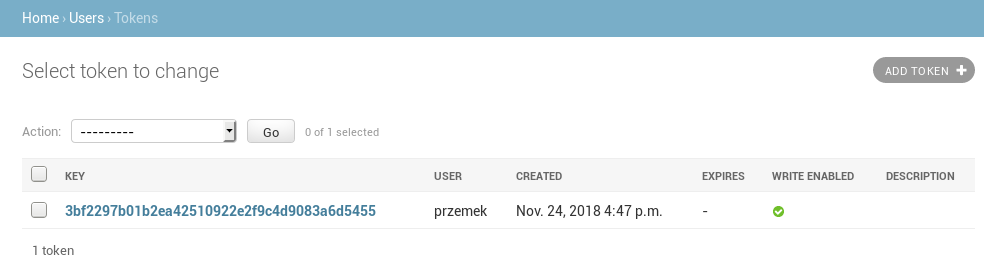
- After you created the token you should see it in the Users -> Tokens section of the admin panel.
Now that we have our token, we can install pynetbox.
Install pynetbox
To install pynetbox in your virtual environment, or globally, simply run pip install:
pip install pynetbox
And that's it, you should be ready to go.
Using pynetbox to retrieve data
In the first post of the series we will use pynetbox for getting information out of NetBox. We'll see how to reach different apps in NetBox, how to retrieve objects, and how to work with them.
Before we start talking to NetBox we need to import pynetbox and instantiate pynetbox.api class.
import pynetbox

nb = pynetbox.api(url=NETBOX_URL, token=TOKEN)
Where NETBOX_URL is the full URL, including http:// or https://, of your NetBox instance. TOKEN is the API token we created in the setup stage.
NetBox uses concetps of apps, such as dcim, tenancy, or circuits, which serve as logical groupings of models. Then within each apps we have endpoints, i.e. models, like prefixes or vlans for ipam, and devices or sites for dcim. To retrieve information from NetBox with pynetbox we simply need to provide app name, the endpoint, and verb that specifies action for the endpoint.
pynetbox.<application>.<endpoint>.<verb>
I recommend using built in API docs, accessible at NETBOX_URL/api/docs/, for exploring available apps and their endpoints.
Now that we know what's what, we will start with first example, where we retrieve all of the prefixes.
all_prefixes = nb.ipam.prefixes.all()

print(all_prefixes)
[10.0.0.0/8, 10.0.0.0/10, 10.0.0.0/16, 10.0.0.0/28, 10.48.0.0/16, 10.48.5.64/26,
10.64.0.0/10, 10.66.0.0/16, 10.66.51.128/25, 10.99.0.0/16, 10.99.50.0/24, 10.128.0.0/10,
10.133.0.0/16, 10.133.196.0/24, 10.140.0.0/16, 10.140.15.192/27, 192.168.0.0/16]
This looks great, we got back list of prefixes. Note lack of quotes around elements on the list. This is because these are not strings but prefix objects.
Let's have a closer look at prefix at index 5 say, to see what type prefix objects are.
print(type(all_prefixes[5]))

<class 'pynetbox.ipam.Prefixes'>
So an individual prefix is an object of class Prefixes. This object has a number of attributes that allow us to find out more about it.
Generally all of the objects we retrieve via pynetbox will have attributes mapping to the underlying model used by NetBox. Structure of these models is fully documented in the built-in API docs.
Now, say we want to print prefix and its site, tenant, role as well as description.
my_pfx = all_prefixes[5]

fmt = "{:<20}{:<20}{:<20}{:<20}{:<20}"
header = ("Prefix", "Site", "Tenant", "Role", "Description")

print(fmt.format(*header))
print(
    fmt.format(
        str(my_pfx.prefix),
        my_pfx.site.name,
        my_pfx.tenant.name,
        my_pfx.role.name,
        my_pfx.description,
    )
)

Prefix              Site                Tenant              Role           Description
10.48.5.64/26       kampala-dc-01       Uganda Press        Web Server     CST-UGANDA-PRESS
That's some pretty output, but why did I use str(mypfx.prefix) and mypfx.<attribute>.name in my expression?
Well, it turns out that many of those attributes are objects themselves. Some of them, like mypfx.prefix need to be converted to string before being displayed, and for some we need to access their attributes to get to the information that we need.
It might look a bit complicated but this is what makes using pynetbox so powerful. It'll also make more sense once we start using filters, and later creating and updating objects.
Drilling down, we'll have a closer look at the type of the mypfx.prefix object to see what's special about it.
print(type(my_pfx.prefix))

<class 'netaddr.ip.IPNetwork'>
We have an instance of IPNetwork class here. And this is really cool because we didn't have to do anything special to get it, but now we can do some useful things with it.
What is your hostmask Mr Prefix?
pfx = my_pfx.prefix

print(pfx.hostmask)

0.0.0.63
Thanks for that, I can now plug this into my ACLs!
And what would the 10th IP on this network be Mr Prefix?
print(pfx.ip + 10)

10.48.5.74
Again, how easy was that?
Have a look at https://netaddr.readthedocs.io/en/latest/index.html to see what else you can do with netaddr objecfts.
As you can see, it does make sense for pynetbox to have some of the attributes as objects of particular classes as this allows for a much richer set of operations.
After this little diversion we are returning to the main topic.
We know how to retrieve all prefixes, and then how to work with single one after choosing it from the list. This however wasn't the most intuitive way of accessing that particular prefix. After all you needed to know what its position was in the list.
Using filter() and get()
Time to learn filter and get verbs that can act upon NetBox's endpoints.
In our next example we want to get prefixes contained within 10.128.0.0/10 that are marked as active. This is where filter() shines, it takes attributes and their desired values, and returns objects matching the criteria.
pfx_search = nb.ipam.prefixes.filter(within="10.128.0.0/10", status=1)

print(pfx_search)
print()
for pfx in pfx_search:
      print(pfx.prefix, pfx.status)

[10.133.196.0/24, 10.140.15.192/27]

10.133.196.0/24 Active
10.140.15.192/27 Active
It seems to have worked, we only got 2 prefixes, which indeed belong to 10.128.0.0/10 and they show as being active.
Can you see how powerful and intuitive this is? You can mix and match a number of attributes to get prefixes of interest.
Now, the final trick, getting single prefix, instead of a list. For that we need to use get(), which returns single matching object, and we need to provide attributes uniquely identifying the prefix, otherwise we'll get an error.
Let's try retrieving a single prefix, say 10.99.50.0/24, using get, to which we'll pass argument "q" for query:
single_prefix = nb.ipam.prefixes.get(q="10.99.50.0/24")

print(single_prefix)

Traceback (most recent call last):
  File "/home/przemek/coding/netbox/netbox_prefixes.py", line 46, in <module>
    single_prefix = nb.ipam.prefixes.get(q="10.99.50.0/24")
  File "/home/przemek/coding/netbox/venv/lib/python3.7/site-packages/pynetbox/lib/endpoint.py", line 161, in get
    raise ValueError('get() returned more than one result.')
ValueError: get() returned more than one result.
Well, that didn't work because our query was not specific enough. Let's feed this query to filter and see what happens.
single_prefix = nb.ipam.prefixes.filter(q="10.99.50.0/24")

print(single_prefix)

[10.0.0.0/8, 10.64.0.0/10, 10.99.0.0/16, 10.99.50.0/24]
This explains what happened. With q="10.99.55.0/24" we get the prefix we're after, but also prefixes that contain it.
To get exact match we'll have to provide another attribute to get, masklength. With masklength set to 24 we can change q value to "10.99.50.0", and this should be enough to get an exact match if you're not using VRFs. If you're using VRFs you will have to provide vrf or vrfid to uniquely identify desired prefix.
single_prefix = nb.ipam.prefixes.get(q="10.99.50.0", mask_length=24)

print(single_prefix)

10.99.50.0/24
Much better, a single matching object was returned, not a list.
All object information in one place
We already know how to access individual attributes of the prefix, but what if we just want to see all of the information about this object, in one place?
We can cheat a bit and access private variable _index_cache which holds a list of tuples (attribute, value). Or we can dig even deeper by accessing _full_cache which will fully expand object references, like tenant or site.
List of tuples in _index_cache for prefix object:
pprint(single_prefix._index_cache)

[('id', 17),
 ('family', 4),
 ('prefix', '10.99.50.0/24'),
 ('site', 6),
 ('vrf', None),
 ('tenant', 3),
 ('vlan', None),
 ('status', 1),
 ('role', 2),
 ('is_pool', False),
 ('description', 'CST-ARANA-IA'),
 ('tags', []),
 ('custom_fields', {}),
 ('created', '2018-11-24'),
 ('last_updated', '2018-11-24T19:34:23.756310Z')]
Referenced objects fully expanded when accessing _full_cache:
pprint(single_prefix._full_cache)
[('id', 17),
 ('family', 4),
 ('prefix', IPNetwork('10.99.50.0/24')),
 ('site',
  {'id': 6,
   'name': 'buenosaires-dc-01',
   'slug': 'buenosaires-dc-01',
   'url': 'http://localhost/api/dcim/sites/6/'}),
 ('vrf', None),
 ('tenant',
  {'id': 3,
   'name': 'Arana IA',
   'slug': 'arana-ia',
   'url': 'http://localhost/api/tenancy/tenants/3/'}),
 ('vlan', None),
 ('status', {'label': 'Active', 'value': 1}),
 ('role',
  {'id': 2,
   'name': 'Machine Learning FPGA',
   'slug': 'machine-learning-fpga',
   'url': 'http://localhost/api/ipam/roles/2/'}),
 ('is_pool', False),
 ('description', 'CST-ARANA-IA'),
 ('tags', []),
 ('custom_fields', {}),
 ('created', '2018-11-24'),
 ('last_updated', '2018-11-24T19:34:23.756310Z')]
Bear in mind that these are private attributes, which can change in the future, so don't rely on them in the production code.
Examples of accessing other endpoints
Accessing other endpoints in NetBox works pretty much the same as accessing prefixes. The only difference will be number of, and naming of, the attributes that can be used when using filter and get methods.
For completeness I'm showing some more examples so you can get better feeling for how things work:
Retrieving all regions:
all_regions = nb.dcim.regions.all()
print(all_regions)

[Americas, North America, South America, APAC, Asia, Oceania, EMEA, Africa, Europe]
Retrieving all sites that belong to South America region:
sites = nb.dcim.sites.filter(region="south-america")
print(sites)

[buenosaires-dc-01]
Note that in the all regions list you can see "South America" but in the filter applied to sites I used "south-america". This is because some filter attributes expect slugs of the linked objects.
I recommend using slugs when retrieving objects even where name attribute is accepted. Slugs are derived from names but should be more stable and by default NetBox makes them all lower case with spaces replaced by hyphens. You can also keep the slug the same even when the name of the object changes.
Let's play around with devices now.
Get all of the devices in NetBox:
devices = nb.dcim.devices.all()

print(devices)

[sw-leaf-warsaw-01, sw-leaf-warsaw-02, sw-spine-warsaw-01]
Now, let's get a single device by name:
leaf_warsaw = nb.dcim.devices.get(name="sw-leaf-warsaw-01")

print(leaf_warsaw)

sw-leaf-warsaw-01
This device has device type, let's get device type id and then we'll get all of the devices of this type.
leaf_dev_type = nb.dcim.device_types.get(leaf_warsaw.device_type.id)

print(
    "Manufacturer: {manuf} - Model: {model}".format(
        manuf=leaf_dev_type.manufacturer, model=leaf_dev_type.model
    )
)

aristas_7060 = nb.dcim.devices.filter(device_type_id=leaf_dev_type.id)
print(aristas_7060)

Manufacturer: Arista - Model: 7060CX2-32S

Devices using 7060CX2-32S model:
[sw-leaf-warsaw-01, sw-leaf-warsaw-02]
Can you see how quickly you can move between objects by feeding results from one query into another one? With connecting pynetbox.api calls we can build more complex logic that will fit your needs. This is really where pynetbox shines.
That'll be the end of the first post in the series. In the future post I will be showing how to create new objects, and update existing ones. I might also show more examples with program logic built from several API calls.
References:
- https://github.com/progala/ttl255.com/tree/master/netbox/pynetbox-part1 - My Github repo with code used in this post
- https://github.com/digitalocean/netbox - NetBox Github repo
- https://netbox.readthedocs.io/en/stable/ - NetBox docs
- https://github.com/digitalocean/pynetbox - Pynetbox Github repository
- https://pynetbox.readthedocs.io/en/latest/ - Pynetbox Docs
- https://github.com/drkjam/netaddr - Netaddr Github repository
- https://netaddr.readthedocs.io/en/latest/ - Netaddr Docs