
Time for another post in the series on Pynetbox, API client for NetBox. In the previous posts I showed how to retrieve, create and modify objects. Here we'll have a look at a few more interesting and useful examples of leveraging Pynetbox. I'm hoping to continue this series as NetBox is very feature rich and pretty much all of these features can be used programmatically with the help of Pynetbox. I hope this series will provide you with some inspiration as well as help in learning these great tools.
Posts in the Pynetbox series:
- Pynetbox - NetBox Python API client part 1 - getting info
- Pynetbox - NetBox Python API client part 2 - creating objects
- Pynetbox - NetBox Python API client part 3 - updates and deletions
- Pynetbox - NetBox Python API client part 4 - tags and auto-assign prefixes
Contents
- Software versions in this blog post
- Setup and prerequisites
- Automatically assigning IP prefixes
- For the love of tags
- Conclusion
- GitHub repository with resources for this post
- References
Software versions in this blog post
This blog post is based on the following versions of software:
- NetBox v2.5.6
- Pynetbox v4.0.6.
Examples were run with Python v3.7.0 but should work with any version of Python3.
Setup and prerequisites
I assume you already have NetBox installed and that machine running Pynetbox has access to it. Before installing Pynetbox you will also need to create API token, if you don't have one already.
I covered API token creation in the first post in the series. If you need to creat one follow the link before proceeding: https://ttl255.com/pynetbox-netbox-python-api-client-p1-getting-info/#setup-prereq
Automatically assigning IP prefixes
NetBox has quite a few tricks up its sleeve and one of them is ability to automatically allocate IP addresses and prefixes. With that functionality we can easily find out what IPs/prefixes are available for assignment in a given range. Better yet, we can ask Netbox to simply create a new object given parent prefix.
So how does one do it using Pynetbox? It's quite intuitive really, first we retrieve parent prefix from NetBox:
pnt_pfx = "10.0.4.0/22"

nb_pnt_pfx = nb.ipam.prefixes.get(prefix=pnt_pfx)
Once Pynetbox retrieved prefix from NetBox it will return an object of class pynetbox.models.ipam.Prefixes, this object has an attribute available_prefixes which exposes some useful methods. One of these methods, list(), tells us what child prefixes are available within the prefix we just retrieved:
# Show available prefixes
print("Free prefixes within {}:".format(pnt_pfx))
for p in nb_pnt_pfx.available_prefixes.list():
    print("* {prefix}".format(**p))
Free prefixes within 10.0.4.0/22:
* 10.0.5.0/24
* 10.0.6.0/23
Great, seems we've only used up one /24, that's already very useful as we can expose this information to other systems or use in our automation scripts.
But we can go one step further. We can actually ask NetBox to automatically assign a child prefix of a given size:
new_pfx = nb_pnt_pfx.available_prefixes.create({"prefix_length": 25})

field_fmt = "{:>15}: {}"
print("Attributes of newly created prefix (excluding non-set attributes):")
for k, v in new_pfx.items():
    if not v:
        continue
    print(field_fmt.format(k, v))
Attributes of newly created prefix (excluding non-set attributes):
             id: 52
         family: 4
         prefix: 10.0.5.0/25
         status: {'value': 1, 'label': 'Active'}
        created: 2019-03-10
   last_updated: 2019-03-10T21:46:11.150712Z
Yup, it's as easy as that! Pynetbox created a new prefix for us leaving most of the fields at their defaults. With the object in hand we can set other fields as required.
It gets even better than that, we can ask for multiple prefixes, even of varying sizes, at once!
# Prefix lengths for prefixes we want to create
pfx_lengths = [28, 29]

# Create multiple prefixes at once
new_pfxs = nb_pnt_pfx.available_prefixes.create([{'prefix_length': i} for i in pfx_lengths])

print("Attributes of newly created prefixes (excluding non-set attributes):")
for p in new_pfxs:
    print("Prefix {}:".format(p["prefix"]))
    for k, v in new_pfx.items():
        if not v:
            continue
        print(field_fmt.format(k, v))
    print()
Attributes of newly created prefixes (excluding non-set attributes):
Prefix 10.0.5.128/28:
             id: 69
         family: 4
         prefix: 10.0.5.0/25
         status: {'value': 1, 'label': 'Active'}
        created: 2019-03-10
   last_updated: 2019-03-10T21:56:07.753329Z

Prefix 10.0.5.144/29:
             id: 69
         family: 4
         prefix: 10.0.5.0/25
         status: {'value': 1, 'label': 'Active'}
        created: 2019-03-10
   last_updated: 2019-03-10T21:56:07.753329Z
Note When we create multiple prefixes at once, order matters. That is, asking for prefix lengths 28 and 29 will result in different prefixes than asking for prefix lengths 29 and 28. See what happens if we delete prefixes we just created and this time we use list [29, 28] for our prefix lengths:
Attributes of newly created prefixes (excluding non-set attributes):
Prefix 10.0.5.128/29:
             id: 66
         family: 4
         prefix: 10.0.5.0/25
         status: {'value': 1, 'label': 'Active'}
        created: 2019-03-10
   last_updated: 2019-03-10T21:55:24.548037Z

Prefix 10.0.5.144/28:
             id: 66
         family: 4
         prefix: 10.0.5.0/25
         status: {'value': 1, 'label': 'Active'}
        created: 2019-03-10
   last_updated: 2019-03-10T21:55:24.548037Z
This might, or might not, be what you wanted but if you prefer nicely aligned prefixes I suggest passing values of the longer prefixes first.
For the love of tags
Let's now move to something a bit different: tags. Tags are bits of metadata that you can attach to different NetBox objects like prefixes, devices, etc. They are completely arbitrary and can serve as a really powerful weapon in your automation arsenal.
You can use some simple tags to add meaning to your prefixes, where category would be an overkill or when there's no clear cut as to what category prefix belongs to. With a bit of design you can come up with some clever combinations, like marking some of the IPs as belonging to central services and then adding label with the type of service, e.g. "central_service lync" or "central_service jira".
As always with these things, play around and see what works for you. I like using tags where asking for a new NetBox feature would be an overkill, either because it's too specific to my organisation or because it would require a lot of work on the development side.
Ok, so let's get to work. We'll see how we can attach tags to prefixes and devices. Once we're done with that we'll have a look at using tags to filter search results.
Assign tags at the creation time
First we'll see how we can assign tags at the creation time:
# Create prefix and assign tags to it
pfx_atts = {
    "prefix": "10.255.1.0/28",
    "tags": ["mc_src", "prod", "a_side", "nyse"]
}

new_pfx = nb.ipam.prefixes.create(pfx_atts)

# Show attributes of newly created prefix
pprint(dict(new_pfx))
{'created': '2019-03-21',
 'description': '',
 'family': 4,
 'id': 105,
 'is_pool': False,
 'last_updated': '2019-03-21T19:47:04.430898Z',
 'prefix': '10.255.1.0/28',
 'role': None,
 'site': None,
 'status': {'label': 'Active', 'value': 1},
 'tags': ['mc_src', 'a_side', 'prod', 'nyse'],
 'tenant': None,
 'vlan': None,
 'vrf': None}
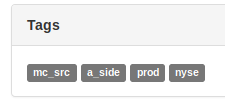
Looking great! All of the tags show up on our prefix.
Tags will also show up in NetBox at the bottom of the page for our prefix:
Note It's important to always pass list object as a value of tags field even if we only have one tag. This is what NetBox expects from us. The following will happen if we pass a string, instead of a one element lists with a string in it:
new_pfx = nb.ipam.prefixes.create(prefix="10.255.1.0/28", tags="mc_src")

pynetbox.core.query.RequestError: The request failed with code 400 Bad Request:

{'tags': ['Invalid json list. A tag list submitted in string form must be valid json.']}
You can use try/except block to catch this error as long as you don't ignore it!
Adding tags to existing object
For our next example we want to tag an existing object. I came up with a tag for devices marked for decom, decom_candidate, that I will try apply to an existing device.
First we need to retrieve object we want to tag and then we have to assign value to the 'tags' attribute:
dev_to_tag = nb.dcim.devices.get(name="rtr-inet-seoul-01")

dev_to_tag.tags =["decom_candidate"]

update_success = dev_to_tag.save()

print("Object updated:", update_success)
Object updated: True
And it worked beautifully. Or did it? What if the object already had some tags?
Oh noes! I forgot that this device already had a tag and we overwrote it! What to do then? How to avoid this easily made mistake in the future?
Conveniently enough tags field in the object Pynetbox returns is a list, empty list in the special case of there being no tags. Knowing that we can simply use list's extend() method, or use '+' operator, either of which will preserve existing tags and will add new tags as needed:
dev_to_tag = nb.dcim.devices.get(name="rtr-inet-seoul-01")

print("Tags currently attached to {0}: {1}".format(dev_to_tag.name, dev_to_tag.tags))
print()

# Attach new tags
dev_to_tag.tags = dev_to_tag.tags + ["decom_scheduled", "with_dco"]

# Alternatively use list's 'extend' method
# dev_to_tag.tags.extend(["decom_scheduled", "with_dco"])

dev_to_tag.save()

updated_dev = nb.dcim.devices.get(name="rtr-inet-seoul-01")
Tags currently attached to rtr-inet-seoul-01: ['decom_candidate']

Tags attached to rtr-inet-seoul-01 after update: ['decom_candidate', 'decom_scheduled', 'with_dco']
So much better! Existing tag is still there and new tags are showing up as well.
I would generally recommend using '+' operator or extend() method when adding tags to existing devices to avoid subtle bugs as this one might be difficult to spot.
So we know how to create objects with tags, add tags to objects and how to protect ourselves against overwriting existing tags. It's time to do some object retrieval based using tags.
Filtering objects with tags
To make filtering with tags a bit more fun I wrote some code generating prefixes with a mix of different labels sourced from the ever popular theme of financial markets.
# Prepare tags we want to combine
mc_side = ["a_side", "b_side"]
mc_exchange = ["nasdaq", "nyse"]
mc_type = ["prod", "cert", "dr"]

# Create product of the tag families
mc_tag_prod = itertools.product(mc_side, mc_exchange, mc_type)

# Create list with lists of resulting tag combinations
# E.g. ['mc_src', 'a_side', 'nasdaq', 'prod']
mc_tags = sorted([["mc_src"] + (list(t)) for t in mc_tag_prod])

# Container from which we will be assigning prefixes
mc_src_container = ipaddress.IPv4Network("10.255.0.0/16")
mc_src_pfxs = mc_src_container.subnets(new_prefix=28)

# Create new prefixes and attach tags to them
for pfx, tag_list in zip(mc_src_pfxs, mc_tags):
    new_pfx = nb.ipam.prefixes.create(prefix=str(pfx), tags=tag_list)
    print("Prefix: {0}, tags: {1}".format(new_pfx.prefix, new_pfx.tags))
This gives us a decent amount of prefixes to play with.
Prefix: 10.255.0.0/28, tags: ['mc_src', 'a_side', 'nasdaq', 'cert']
Prefix: 10.255.0.16/28, tags: ['mc_src', 'a_side', 'nasdaq', 'dr']
Prefix: 10.255.0.32/28, tags: ['mc_src', 'a_side', 'nasdaq', 'prod']
Prefix: 10.255.0.48/28, tags: ['mc_src', 'a_side', 'cert', 'nyse']
Prefix: 10.255.0.64/28, tags: ['mc_src', 'a_side', 'dr', 'nyse']
Prefix: 10.255.0.80/28, tags: ['mc_src', 'a_side', 'prod', 'nyse']
Prefix: 10.255.0.96/28, tags: ['mc_src', 'nasdaq', 'cert', 'b_side']
Prefix: 10.255.0.112/28, tags: ['mc_src', 'nasdaq', 'dr', 'b_side']
Prefix: 10.255.0.128/28, tags: ['mc_src', 'nasdaq', 'prod', 'b_side']
Prefix: 10.255.0.144/28, tags: ['mc_src', 'cert', 'nyse', 'b_side']
Prefix: 10.255.0.160/28, tags: ['mc_src', 'dr', 'nyse', 'b_side']
Prefix: 10.255.0.176/28, tags: ['mc_src', 'prod', 'nyse', 'b_side']
Cool, so how does this tag filtering thing work? Well, it's just like normal filter but we pass it a list of labels assigned to attribute tag.
Let's try it out by getting all nyse prefixes:
nyse_pfxs = nb.ipam.prefixes.filter(tag=["nyse"])

print(nyse_pfxs)
[10.255.0.48/28, 10.255.0.64/28, 10.255.0.80/28, 10.255.0.144/28, 10.255.0.160/28, 10.255.0.176/28]
That looks about right, prefixes on the list match the prefixes we created during set-up.
Time to combine labels, and while we're at it, define the search tags outside of the method call.
tg_nasdaq_aside = ["nasdaq", "a_side"]

tagged_pfxs = nb.ipam.prefixes.filter(tag=tg_nasdaq_aside)

print(tagged_pfxs)
[10.255.0.0/28, 10.255.0.16/28, 10.255.0.32/28]
Again, worked beautifully and I hope you can see how powerful this can be. You can keep adding tags to narrow down the results even further, which is what we're going to do now:
# Get prefixes that are tagged with nyse, prod and b_side labels
tg_nyse_bside_prod = ["nyse", "b_side", "prod"]
tagged_pfxs = nb.ipam.prefixes.filter(tag=tg_nyse_bside_prod)

print("Found {} prefix(es).".format(len(tagged_pfxs)))
print()
print("Prefix: {0}, tags: {1}".format(tagged_pfxs[0].prefix, tagged_pfxs[0].tags))
Found 1 prefix(es).

Prefix: 10.255.0.176/28, tags: ['mc_src', 'prod', 'nyse', 'b_side']
One prefix returned, as expected. Another victory for us with the little help from Pynetbox.
Conclusion
We've come to an end of yet another blog post on Pynetbox. We worked through Python examples showing how to use two of NetBox's powerful features, ability to automatically assign prefixes, and tagging system. Both of these are on the list of my favourite NetBox offerings.
Prefix auto-assignment is a real deal breaker wherever there is need for quick, consistent, resource allocation.
Tagging system is another feature that changed the way I use NetBox. With a bit of thought and design you can enrich your objects with meta-data that you can easily filter on.
I hope that you will find these features as useful as I do. Happy automating!
References:
- https://github.com/progala/ttl255.com/tree/master/netbox/pynetbox-part4 - My Github repo with code used in this post
- https://github.com/digitalocean/netbox - NetBox Github repo
- https://netbox.readthedocs.io/en/stable/ - NetBox docs
- https://github.com/digitalocean/pynetbox - Pynetbox Github repo
- https://pynetbox.readthedocs.io/en/latest/ - Pynetbox Docs