
Welcome to the second post in the series dedicated to Pynetbox, Python API client for NetBox. In this episode I'll be talking about object creation and we'll go through a few code examples showing how can we add stuff to NetBox. Expect some cool Python code and unexpected plot twists!
Posts in the Pynetbox series:
- Pynetbox - NetBox Python API client part 1 - getting info
- Pynetbox - NetBox Python API client part 2 - creating objects
- Pynetbox - NetBox Python API client part 3 - updates and deletions
- Pynetbox - NetBox Python API client part 4 - tags and auto-assign prefixes
Contents
- Software versions in this blog post
- Setup and prerequisites
- Example 1 - Adding single object
- Example 2 - Handling errors and adding object, again...
- Example 3 - Bulk additions of objects
- Example 4 - Creating interconnected objects
- GitHub repository with resources for this post
- References
Software versions in this blog post
This blog post is based on the following versions of software:
- NetBox v2.4.8
- Pynetbox v3.4.7.
Examples are run with Python v3.7.0 but should work with any version of Python3.
Setup and prerequisites
I assume you already have NetBox installed and that machine running pynetbox has access to it. Before installing pynetbox you will also need to create API token, if you don't have one already.
I covered API token creation in the first post in the series. If you need to creat one follow the link before proceeding: https://ttl255.com/pynetbox-netbox-python-api-client-p1-getting-info/#setup-prereq
Example 1 - Adding single object
In the first post in the series we focused on getting information out of NetBox. We've gone through a few examples and learned how to work with pynetbox. Now it's time to take things to the next level and start adding some stuff.
In our first example we'll go through the process of adding a new device, named 'rtr-inet-seoul-01', which happens to be a Cisco ASR 1002-X.
So, yeah, where do we start?
First of all, we need to find out what syntax pynetbox uses to create object.
Let's have a look at the Pynetbox docs @ https://pynetbox.readthedocs.io/en/latest/endpoint.html
create(*args, **kwargs)
	Creates an object on an endpoint.

Parameters:

    *args (list) – A list of dictionaries containing the properties of the objects to be created.
    **kwargs (str) – key/value strings representing properties on a json object.
Perfect, to have pynetbox create object we need to specify app and endpoint, just like we did when retrieving information. Then we need to use very aptly name method, create().
Now, create() takes some parameters, but what are those parameters? We obviously need to somehow pass name of our device and device model to the method, but is that all?
Well, as it turns out, some fields have to have values specified when creating object of a given type. To find out what fields we need to set for device it's best to refer to the API docs.
Below is the partial screenshot of the POST /dcim/devices endpoint. All of the fields with red star next to them have to be specified when creating a device object.
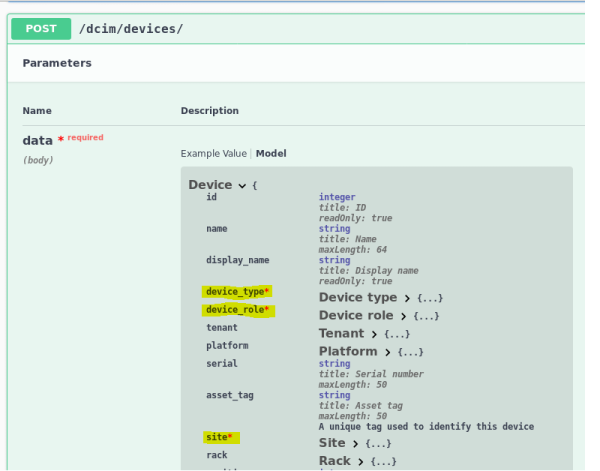
Ok, now that we've got all of that clarified, we'll do some Python magic:
result = nb.dcim.devices.create(
        name="rtr-inet-seoul-01",
        device_type="asr-1002-x",
        device_role="internet-edge",
        site="seoul-dc-01",
    )

print(result)
/home/przemek/coding/netbox/venv/bin/python /home/przemek/coding/netbox/create_objects.py
Traceback (most recent call last):
  File "/home/przemek/coding/netbox/create_objects.py", line 19, in <module>
    site="seoul-dc-01",
  File "/home/przemek/coding/netbox/venv/lib/python3.7/site-packages/pynetbox/lib/endpoint.py", line 298, in create
    ).post(args[0] if len(args) > 0 else kwargs)
  File "/home/przemek/coding/netbox/venv/lib/python3.7/site-packages/pynetbox/lib/query.py", line 302, in post
    raise RequestError(req)
pynetbox.lib.query.RequestError: The request failed with code 400 Bad Request
Hey! What happened? Why did it fail?
This is a very good question, and a good time to talk about handling pynetbox errors.
Example 2 - Handling errors and adding object, again...
When working with pynetbox it's very important to correctly handle errors. Not only will it make our program more stable, but it also allows us to find more about what caused an error.
We'll retry our object creation but this times we'll enclose the code in the try/except block.
try:
    result = nb.dcim.devices.create(
        name="rtr-inet-seoul-01",
        device_type="asr-1002-x",
        device_role="internet-edge",
        site="seoul-dc-01",
    )
except pynetbox.lib.query.RequestError as e:
    print(e.error)

{"device_role":["Primary key must be an integer"],
"device_type":["Primary key must be an integer"],
"site":["Primary key must be an integer"]}
And it all becomes clear. I set parameter values to slugs but NetBox expects primary keys, which are the object ids.
But wait, how should I know what object has what id? And in any case, we shouldn't be hardcoding these, should we?
Luckily, we already know how to retrieve objects given their slug, name, etc. And once the object is retrieved we can easily get its id.
Let's try it then:
req_fields = (
    "Site: {site}, ID: {site_id}\n"
    "Device Type: {dtype}, ID: {dtype_id}\n"
    "Device Role: {drole}, ID: {drole_id}".format(
    site=ndev_site,
    site_id=ndev_site.id,
    dtype=ndev_dtype,
    dtype_id=ndev_dtype.id,
    drole=ndev_drole,
    drole_id=ndev_drole.id,
))

print(req_fields)

Site: seoul-dc-01, ID: 2
Device Type: ASR 1002-X, ID: 5
Device Role: Internet edge, ID: 6
Awesome! We got all of the required ids. And so we're finally ready to create our device object.
try:
    result = nb.dcim.devices.create(
        name="rtr-inet-seoul-01",
        device_type=ndev_dtype.id,
        device_role=ndev_drole.id,
        site=ndev_site.id,
    )
except pynetbox.lib.query.RequestError as e:
    print(e.error)
Tada! We just created our first object using pynetbox. How cool is that?
For completeness I'm showing info stored in the result variable:
pprint(result)

{'asset_tag': None,
 'cluster': None,
 'comments': '',
 'created': '2018-12-02',
 'device_role': {'id': 6,
                 'name': 'Internet edge',
                 'slug': 'internet-edge',
                 'url': 'http://localhost/api/dcim/device-roles/6/'},
 'device_type': {'id': 5,
                 'manufacturer': {'id': 1,
                                  'name': 'Cisco',
                                  'slug': 'cisco',
                                  'url': 'http://localhost/api/dcim/manufacturers/1/'},
                 'model': 'ASR 1002-X',
                 'slug': 'asr-1002-x',
                 'url': 'http://localhost/api/dcim/device-types/5/'},
 'display_name': 'rtr-inet-seoul-01',
 'face': None,
 'id': 7,
 'last_updated': '2018-12-02T18:37:44.165638Z',
 'local_context_data': None,
 'name': 'rtr-inet-seoul-01',
 'parent_device': None,
 'platform': None,
 'position': None,
 'primary_ip': None,
 'primary_ip4': None,
 'primary_ip6': None,
 'rack': None,
 'serial': '',
 'site': {'id': 2,
          'name': 'seoul-dc-01',
          'slug': 'seoul-dc-01',
          'url': 'http://localhost/api/dcim/sites/2/'},
 'status': {'label': 'Active', 'value': 1},
 'tags': [],
 'tenant': None,
 'vc_position': None,
 'vc_priority': None,
 'virtual_chassis': None}
As a bonus, we'll run this code again to see what happens when we try adding device with the name that already exists in NetBox.
{"name":["device with this name already exists."]}
Nope, won't work. Which is great but also shows why we should be adding error handling code!
It's also worth noting that we can pass dictionary to the create() method, instead of specifying parameters in the method call. This gives us more flexibility as we can juggle dictionaries around and easily modify values. We'll see some of that in action in the example that follows.
Example 3 - Bulk additions of objects
Time to move to another example. Let's say you have a new data centre and as part of your initial deployment you are installing 2 spine, and 8 leaf, switches. To do this via GUI would be pretty laborious, even for 10 devices.
We could create objects one by one using pynetbox, which is definitely useful, but wouldn't it be great to be able to add a bunch of devices at once? It would be great, and in fact it is! Pynetbox allows us to do bulk creation of objects by passing list of dictionaries to create() method.
Here's somewhat longish, but highly educational, example code showing how you could add 2 spines and 8 leaves for our new shiny datacentre:
# Specify number of Spine and Leaf switches
SPINE_NUM = 2
LEAF_NUM = 8

# List to store dictionaries with attributes for new devices
melb_devices = list()

# Retrieve objects needed for creation of Melbourne devices
site_melbourne = nb.dcim.sites.get(slug="melbourne-dc-01")
drole_leaf = nb.dcim.device_roles.get(slug="leaf-switch")
drole_spine = nb.dcim.device_roles.get(slug="spine-switch")
dtype_ar7060 = nb.dcim.device_types.get(slug="7060cx2-32s")
dtype_ar7280 = nb.dcim.device_types.get(slug="7280cr2-60")

# Generate attributes for spines
for i in range(1, SPINE_NUM + 1):
    melb_devices.append(
        dict(
            name="sw-spine-melbourne-0{swid}".format(swid=i),
            device_type=dtype_ar7280.id,
            device_role=drole_spine.id,
            site=site_melbourne.id,
        )
    )

# Generate attributes for leaves
for i in range(1, LEAF_NUM + 1):
    melb_devices.append(
        dict(
            name="sw-leaf-melbourne-0{swid}".format(swid=i),
            device_type=dtype_ar7060.id,
            device_role=drole_leaf.id,
            site=site_melbourne.id,
        )
    )

try:
    # Try creating all of the devices at once
    results = nb.dcim.devices.create(melb_devices)

    # Set formatting and header
    fmt = "{:<25}{:<15}{:<15}{:<15}"
    header = ("Device", "Dev Role", "Dev Type", "Site")

    # Print header
    print(fmt.format(*header))

    # Print summary info for each of the devices
    for r in results:
        print(
            fmt.format(
                r["name"],
                r["device_role"]["name"],
                r["device_type"]["model"],
                r["site"]["name"],
            )
        )

    # As a bonus, dump to json file objects returned by NetBox
    with open("melbourne_devices.json", encoding="utf-8", mode="w") as fout:
        json.dump(results, fout)

except pynetbox.lib.query.RequestError as e:
    print(e.error)
And resulting summary of added devices:
Device                   Dev Role       Dev Type       Site
sw-spine-melbourne-01    Spine switch   7280CR2-60     melbourne-dc-01me
sw-spine-melbourne-02    Spine switch   7280CR2-60     melbourne-dc-01
sw-leaf-melbourne-01     Leaf switch    7060CX2-32S    melbourne-dc-01
sw-leaf-melbourne-02     Leaf switch    7060CX2-32S    melbourne-dc-01
sw-leaf-melbourne-03     Leaf switch    7060CX2-32S    melbourne-dc-01
sw-leaf-melbourne-04     Leaf switch    7060CX2-32S    melbourne-dc-01
sw-leaf-melbourne-05     Leaf switch    7060CX2-32S    melbourne-dc-01
sw-leaf-melbourne-06     Leaf switch    7060CX2-32S    melbourne-dc-01
sw-leaf-melbourne-07     Leaf switch    7060CX2-32S    melbourne-dc-01
sw-leaf-melbourne-08     Leaf switch    7060CX2-32S    melbourne-dc-01
Just beautiful. Did you see how easy it was to dynamically compose attributes and create list of devices to be added?
This is where pynetbox really shows its powers, we can quickly and intuitively create hundreds of objects.
Example 4 - Creating interconnected objects
For the last example in this post we'll tackle a scenario where we create objects that are connected to each other. Here order of operations matters and so we need to think through our workflow before getting on with things.
What we want to do is to create a device, with interface and IP address assigned to this interface. In order to that we need to look at the relevant data models and figure out how can we connect these objects together.
Let's have a look at IPAddress model first.
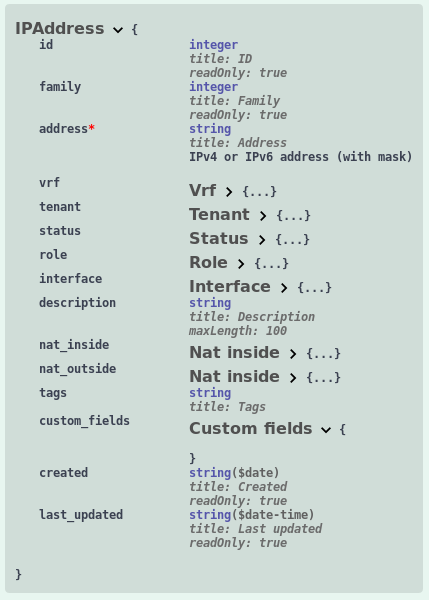
The only required attribute is address and we see that there's an attribute called interface, taking id of an interface object. This means we need to have id of the interface handy before we can create the IPAddress object connected to it.
Time to have a look at Interface model then.
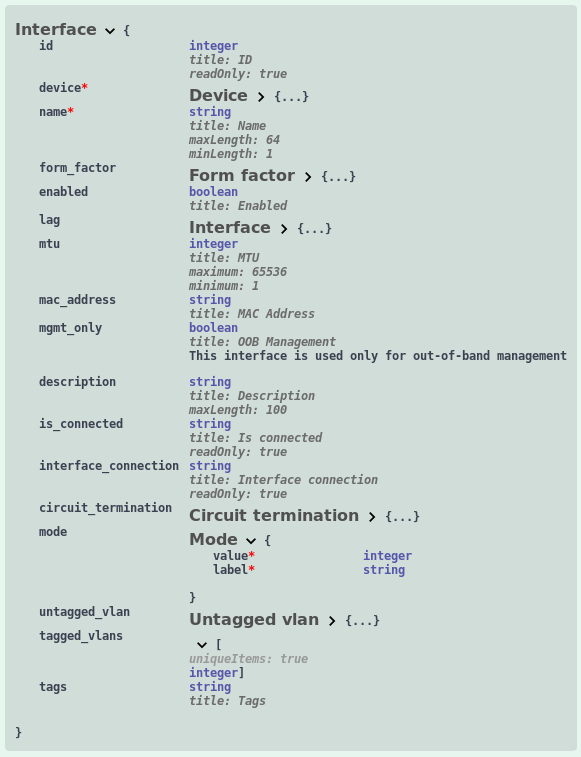
There are two required attributes, device and name. This makes sense, not much point in creating interfaces that are not attached to devices. No other attributes are required so we'll just need id of the device to which this interface belongs.
So that's it, we can now conclude our investigation and build required workflow. We'll create device object, then we can create interface that will reference device id, and finally we'll be able to add IP address, which in turn will reference interface id.
Let's get to work and write some awesome Python code!
# Retrieve objects needed for creation of the device
dev_type = nb.dcim.device_types.get(slug="3750g-48ts")
dev_role = nb.dcim.device_roles.get(slug="management-switch")
dev_site = nb.dcim.sites.get(slug="kampala-dc-01")

# Prepare dict with attributes for our device
dev_dict = dict(
    name="sw-mgmt-kampala-01",
    device_type=dev_type.id,
    device_role=dev_role.id,
    site=dev_site.id,
)

# Add device to NetBox and store resulting object in "new_dev"
new_dev = nb.dcim.devices.create(dev_dict)

# Prepare dict with attributes for Management interface
intf_dict = dict(
    name="Vl841",
    form_factor=0,
    description="Management SVI",
    device=new_dev["id"]
)

# Add interface to NetBox and store resulting object in "new_intf"
new_intf = nb.dcim.interfaces.create(intf_dict)

# Prepare dict with attributes for Management IP address
ip_add_dict = dict(
    address="10.1.6.18/32",
    status=1,
    description="Management IP for {}".format(dev_dict["name"]),
    interface=new_intf["id"],
)

# Add interface to NetBox and store resulting object in "new_ip"
new_ip = nb.ipam.ip_addresses.create(ip_add_dict)

# Display summary, just to see if objects were really created
print(
    "Device '{dev}' created with interface '{intf}', which has IP {ipadd}.".format(
        dev=new_dev["name"], intf=new_intf["name"], ipadd=new_ip["address"]
    )
)
Summary, because we love summaries:
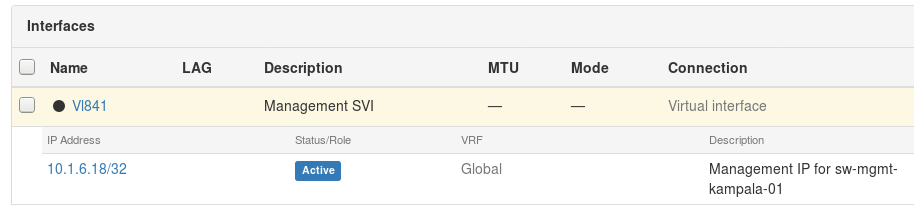
Device 'sw-mgmt-kampala-01' created with interface 'Vl841', which has IP 10.1.6.18/32.
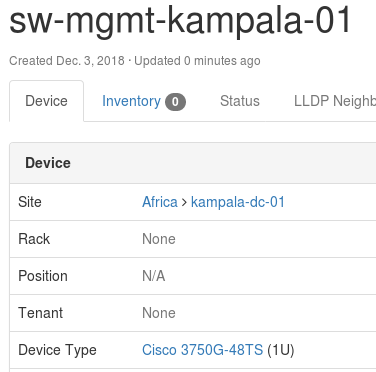
And for completeness, some lovely screenshots from NetBox.
Looking pretty. Three objects created and linked together just the way we wanted it.
With this example we conclude our discussion dedicated to creating objects with pynbetbox. I hope you now have a good grasp of how objects can be created and how to build more complex workflows with pynetbox.
Stay tuned for more blog posts in the series. In the future episodes we'll tackle updates and deletions. Towards the end of series I hope to go into more specific cases, touching upon secrets and custom fields, among other things.
References:
- https://github.com/progala/ttl255.com/tree/master/netbox/pynetbox-part2 - My Github repo with code used in this post
- https://github.com/digitalocean/netbox - NetBox Github repo
- https://netbox.readthedocs.io/en/stable/ - NetBox docs
- https://github.com/digitalocean/pynetbox - Pynetbox Github repo
- https://pynetbox.readthedocs.io/en/latest/ - Pynetbox Docs